How to Update Among Us (Bluestacks, iPhone, Android, Console)

How to Update Among Us (Bluestacks, iPhone, Android, Console)

How to Update Among Us (Bluestacks, iPhone, Android, Console)

Do you need to keep your Among Us Game fresh and updated? We will show you exactly how to do so on every Platform.

The Platforms you can update Among Us on include, Steam, iPhone (iOS), Android, Xbox, Nintendo Switch, & BlueStacks.

What is the best device to play Among Us on?

Among Us is a game that works well on every device. Since Among Us requires observation, reasoning, and judgement skills rather than combat skills, the device you play on doesn’t affect much of your game play.

If you have more than one device to play on, just use the device that runs fastest for Among Us. Otherwise, you’ll be all good to play smoothly.

Can Among Us Update automatically?

Yes, if you change the settings of the device you are playing on, you can have all your updates happen automatically. Updates will only happen if you are connected to the internet.

If you are planning to update Among Us manually though, there are straightforward ways to do so!

Updating Among Us on Steam

For PC Players, Among Us is commonly played via Steam. To play on Steam you are required to pay a small amount of money, but updates will be completely free!

The First step to updating Among Us is to launch the Steam app, of course.

After opening Steam, you will next have to press the “Library” Button located at the top.

Steam-library-button

Look through your list of games for Among Us.

Once you see your Among Us Game, right click on it and choose “Properties”

Simply Update!

steam-among-us-update

Updating Among Us on iPhone

To Update Among Us on your iPhone (iOS Device), you will need to…

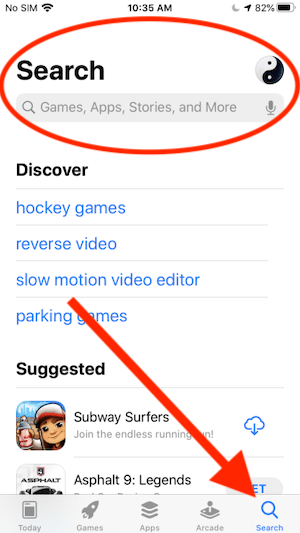
First, search “Among Us” in the App Store.

iphone-app-store
iphone-search-app-store

Press the Among Us Game.

Lastly, click the Update Button and your Among Us Game will update as long as you are connected to the internet.

update-among-us-iphone

Updating Among Us on Android

To Update Among Us on your Android Device, you will need to…

Open the Google Play Store.
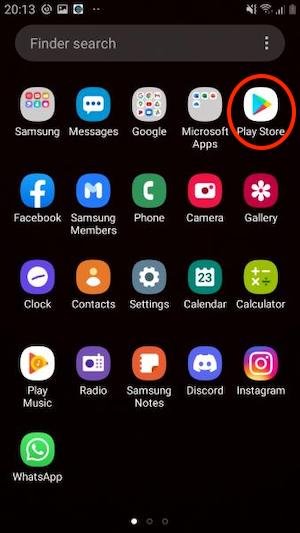
google-playstore-home

Now, just use the search bar to search “Among Us”. You can update the app just like that!
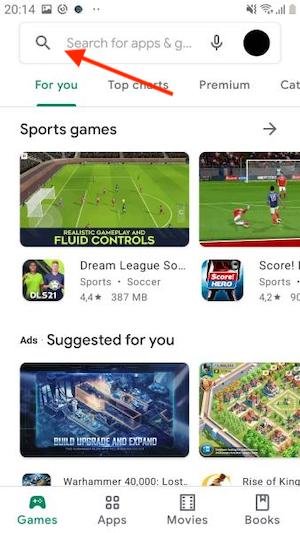
among-us-search-android

Updating Among Us on Xbox

To Update Among us on Xbox you will need to…

Head to your Xbox and press the Xbox Button (located on your controller).

xbox-xbox-button

Once done, Press on “Profile & System”.

Next, click the “Settings”.

Then, Press “System”.

Finally, you can now select “Updates”.

What are you waiting for?! Go and update Among Us!

Updating Among Us on Nintendo Switch

To Update Among Us on Nintendo Switch, here is what you’ll need to do…

Head to your Nintendo Switch & turn it on.

You will have to search for “Among Us” in your games section.

Now, open the Among Us Game’s “Options Menu” (You can do this by pressing the plus/minus button on the controller).

Click on “Software Update” and from there press “Via the Internet”.

nintendo-switch-software-update
nintendo-switch-via-the-internet-download

Among Us should update quickly.

Updating Among Us on BlueStacks

Updating Among us on BlueStacks is similar to updating Among Us on Android since BlueStacks in an Android Emulator. Now that you know this, let’s get on to updating Among Us!

Firstly, Open BlueStacks.

open-bluestacks

Head to “Play Store”.

open-play-store

Press the “Games” Button on the left, and search “Among Us”.
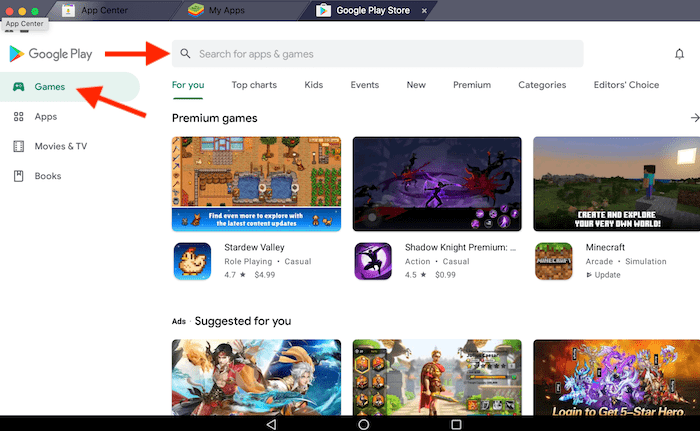
among-us-games-and-search-bluestacks

I am sure you know what to do, press update!
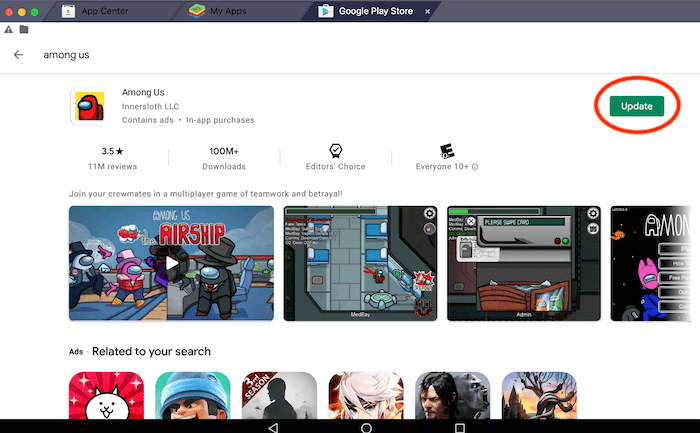
update-among-us-bluestacks

Keep up with Among Us Updates!

Among Us has many updates and a hard working staff! To get these updates as soon as possible, consider doing the following…

 Join the Official Among Us Discord Server to see game updates and chat with the community!

Check out the Among Us Tweets too!

If you’ve found this post helpful, have any questions, suggestions, or problems at all, please feel free to comment below.

Tap Titans 2 Tournaments

Tap Titans 2 Tournaments

Tap Titans 2 Tournaments

Are you interested in participating in tournaments against other players for special rewards? Well, if you are, learning about tournaments on Tap Titans 2 is the first step.

Joining tournaments have no costs or repercussions and are lots of fun. So, why not give it a try, right?! tongue-out

What are Tournaments?

Tournaments happen weekly and they are a fun way for players to compete for prizes. When you join a tournament, you get placed into tournament groups of your level and around a similar time that you’ve joined. Joining tournaments right as they start is ideal, but joining late does not place you at a severe disadvantage because of the well thought-out algorithm.

Each tournamemt bracket can fill up to 200 players, but it varies (Sometimes 100 or 50 players instead). Every player who joins a tournament will get a prize. As expected, higher ranks will get better rewards so try your best to be the #1 undisputed champion!

Currently, there are two types of tournaments.

1. The Standard Tournament

2. The Abyssal Tournament

You can have eligibily to join both of these tournaments when you’ve reached a high enough stage in the Main Game.

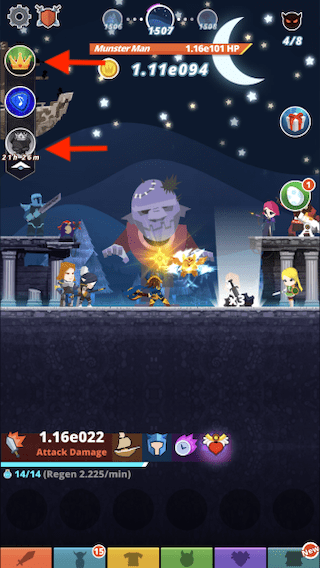
Check here for both Tournaments…

tap-titans-2-tournaments-find

*image above* – Standard Tournament on Top, Abyssal Tournament on Bottom.

The Tournament Button will have color if there are active tournaments going on that you can join. 

Standard Tournaments

Standard Tournaments happen every Sunday and Wednesday, lasting for 24 hours. You will have to Prestige in order to join the tournament so that everyone has an evening playing field. Make sure to use those prestige relics you gain to discover/upgrade artifacts.

For the Tournament, you want to reach the highest stage possible. You will be using your assets that you’ve already gotten. 

Standard Tournament Rewards

The Standard Tournament Rewards are placed into 10 Brackets. 

These Brackets are determined by your level.

Bracket 1 

Rank
Gems
Tournament Points
Weapon upgrades
Shards
Eggs
Skill points
Perks
1 (Undisputed)
300
70
14
80
10
4
8
1 (Tied)
250
50
10
55
7
3
6
2-3
150
35
8
40
6
3
5
4-10
100
30
7
30
6
2
4
11-25
75
25
6
20
5
2
3
26-50
50
20
5
15
4
1
2
51-80
30
15
4
10
3
1
1
81-130
20
10
2
5
2
1
1
131-200
10
5
1
5
1
1
1

Bracket 2

Rank
Gems
Tournament Points
Weapon upgrades
Shards
Eggs
Skill points
Perks
1 (Undisputed)
400
70
14
80
10
4
8
1 (Tied)
300
50
10
55
7
3
6
2-3
200
35
8
40
6
3
5
4-10
150
30
7
30
6
2
4
11-25
100
25
6
20
5
2
3
26-50
75
20
5
15
4
1
2
51-80
50
15
4
10
3
1
1
81-130
25
10
2
5
2
1
1
131-200
15
5
1
5
1
1
1

Bracket 3

Rank
Gems
Tournament Points
Weapon upgrades
Shards
Eggs
Skill points
Perks
1 (Undisputed)
450
70
14
80
10
4
8
1 (Tied)
350
50
10
55
7
3
6
2-3
225
35
8
40
6
3
5
4-10
175
30
7
30
6
2
4
11-25
125
25
6
20
5
2
3
26-50
100
20
5
15
4
1
2
51-80
75
15
4
10
3
1
1
81-130
30
10
2
5
2
1
1
131-200
20
5
1
5
1
1
1

Bracket 4

Rank
Gems
Tournament Points
Weapon upgrades
Shards
Eggs
Skill points
Perks
1 (Undisputed)
600
70
14
80
10
4
8
1 (Tied)
400
50
10
55
7
3
6
2-3
300
35
8
40
6
3
5
4-10
200
30
7
30
6
2
4
11-25
150
25
6
20
5
2
3
26-50
100
20
5
15
4
1
2
51-80
75
15
4
10
3
1
1
81-130
30
10
2
5
2
1
1
131-200
20
5
1
5
1
1
1

Bracket 5

Rank
Gems
Tournament Points
Weapon upgrades
Shards
Eggs
Skill points
Perks
1 (Undisputed)
700
100
16
90
12
5
10
1 (Tied)
450
70
12
60
8
4
8
2
350
50
10
50
7
3
6
3-5
250
35
8
40
6
3
5
6-10
200
30
7
30
6
2
4
11-25
150
25
6
20
5
2
3
26-50
100
20
5
15
4
1
2
51-75
75
15
4
10
3
1
1
76-130
30
10
2
5
2
1
1

Bracket 6

Rank
Gems
Tournament Points
Weapon upgrades
Shards
Eggs
Skill points
Perks
1 (Undisputed)
900
150
18
100
14
7
15
1 (Tied)
600
100
14
70
9
5
10
2
450
75
12
55
8
4
8
3-5
300
50
10
45
7
3
6
6-10
200
40
8
30
6
2
5
11-20
150
30
6
25
5
2
4
21-40
125
25
5
20
4
2
3
41-60
100
20
5
15
3
1
2
61-100
50
15
3
10
3
1
1

Bracket 7

Rank
Gems
Tournament Points
Weapon upgrades
Shards
Eggs
Skill points
Perks
1 (Undisputed)
1000
200
22
110
15
8
18
1 (Tied)
600
125
16
80
10
5
12
2
500
100
13
60
9
4
10
3-4
350
70
11
50
8
3
7
5-7
300
50
9
40
7
3
6
8-10
250
40
8
35
6
2
5
11-20
200
35
6
30
5
2
4
21-30
150
30
5
25
4
2
3
31-50
100
25
5
20
3
1
2

Bracket 8

Rank
Gems
Tournament Points
Weapon upgrades
Shards
Eggs
Skill points
Perks
1 (Undisputed)
1200
200
24
120
15
10
20
1 (Tied)
650
125
16
80
10
6
12
2
500
100
13
65
9
5
10
3-4
350
70
11
50
8
4
7
5-7
300
50
9
40
7
3
6
8-10
250
40
8
35
6
2
5
11-20
200
35
6
30
5
2
4
21-30
150
30
5
25
4
2
3
31-50
100
25
5
20
3
1
2

Bracket 9

Rank
Gems
Tournament Points
Weapon upgrades
Shards
Eggs
Skill points
Perks
1 (Undisputed)
1200
250
28
140
16
10
20
1 (Tied)
650
150
20
90
12
6
12
2
500
125
16
75
10
5
10
3
400
100
13
60
9
4
8
4
350
80
11
50
8
4
7
5-6
300
60
9
40
7
3
6
7-10
250
50
8
35
6
2
5
11-15
200
40
6
30
5
2
4
16-25
150
35
6
25
4
2
3

Bracket 10

Rank
Gems
Tournament Points
Weapon upgrades
Shards
Eggs
Skill points
Perks
1 (Undisputed)
1200
300
32
160
16
10
20
1 (Tied)
700
200
22
120
12
6
12
2
550
150
18
105
10
5
10
3
450
125
16
90
9
4
9
4
400
100
14
75
8
4
8
5-6
350
80
12
60
7
3
7
7-10
300
70
10
50
7
3
6
11-15
250
60
9
40
6
2
5
16-25
200
50
7
30
5
2
4

Additionally, you will get Seasonal Pass reward currency from tournaments. 

Standard Tournament Bonus Rules

Every Standard Tournament has special Bonus Rules that make the Tournament unique.

These Bonus Rules will be one of the following…

  • x10 gold from bosses
  • Heroes, Clan Ship, and War cry skill will each do x3 damage
  • Regenerate +5 additional mana per minute
  • Probability type bonuses will increase by x1.2
  • Heavenly Strike, Hand of Midas, and Shadow Clone skills will each be x3 as strong
  • x10 gold earned from Chestersons
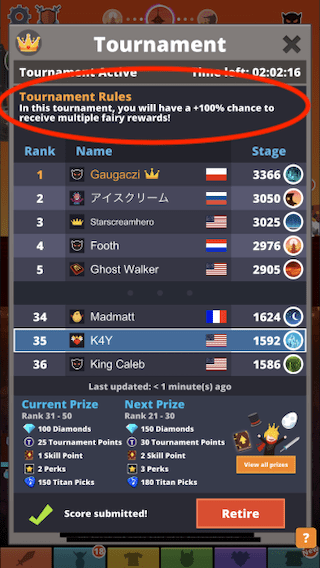
  • 100% chance of receiving multiple fairy rewards
  • Taps, Pet Attacks, and Firesword skill will each do x3 damage
  • +20% refund on all active skill mana costs
  • Amount of relics earned increased by x1.5

Check under “Tournament Rules”.

tap-titans-2-tournament-bonuses

Abyssal Tournaments

Abyssal Tournaments happen every Friday. You are allowed to participate in Abyssal Tournaments once you reach stage 1000 on the main game. Just like the Standard Tournaments, Abyssal Tournaments last 24 hours. 

For the Abyssal Tournament, you are warped to a different screen when you join. This is because the Abyssal Tournament happens on a different Map. 

tap-titans-2-abyssal-tournament-map
You can always return to the main game during an Abyssal Tournament.
tap-titans-2-tournament-main-game

Each Abyssal Tournament consists of 50 Players. Like all Tournaments, the goal is to reach a higher stage than all the other opponents by the time the 24 hours end. 

Abyssal Tournament Rewards

There are no Brackets in an Abyssal Tournament because all players compete with the same assets.

This means the ranked rewards stay the same for everyone, no matter their level.

tap-titans-2-abyssal-tournament-rewards

Abyssal Tournament Bonus Rules

Every Abyssal Tournament has special Bonus Rules that make the Tournament unique.

Tournament type
Starting stage
Starting inventory
Starting Bonuses
Time Storm
1000
5000 Corrupted Diamonds, 15 Pets, 10 Skill Points, 37 Fortune Hero Weapons, Angelic Guardian Equipment Set
20% Advance Start, 50% Portar Chance, 15% Snap Chance, 25% Manni Mana Chance, +20 Manni Mana Mana, 1000000% Splash Damage, 1e15 All Damage
Companion Frenzy
1000
5000 Corrupted Diamonds, 100 Skill Points, 37 Fortune Hero Weapons
50% Advance Start, 50x Companion Attack Rate, 100% Splash Damage, 1e15 All Damage
Shimmering Grotto
500
10,000 Corrupted Diamonds, 35 Skill Points, 1000 Crafting Shards, Treasure Hunter set, 37 Fortune Hero Weapons
75% Advance Start, 10x All Equipment Primary Boost, 10,000% Splash Damage
Enchanted Mind
1500
5000 Corrupted Diamonds, 7000 Skill Points, 37 Fortune Hero Weapons
80% Advance Start, 10,000% Splash Damage
Solar Eclipse
1500
5000 Corrupted Diamonds, 100 Skill Points, 37 Fortune Hero Weapons, Ruthless Necromancer Equipment Set
60% Advance Start, 15% Shadow Clone Splash Through Bosses Chance, 100x Shadow Clone Damage, 10,000x All Spell Bonus, 10,000% Splash Damage, +500 Mana Capacity, 2x All Spell Duration, +50 Splash Count

Note: Corrupted Diamonds are the currency in the Abyssal Tournament.

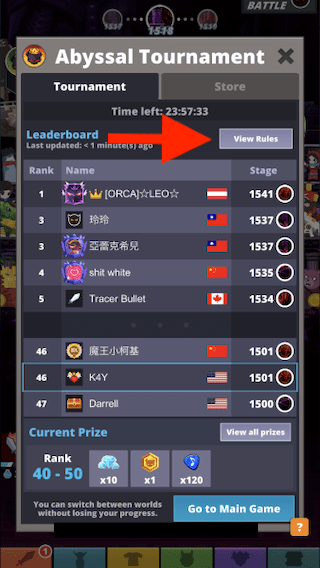
Press “View Rules” to find the Tournament Type.

tap-titans-2-abyssal-tournament-rules

These Bonuses Stay the Same for every Abyssal Tournament Type…

  • Equipment will sell for more
  • Shop is cheaper
  • Chests in Shop have better items

Abyssal Tournament Strategy Tips

  • Clan Ship & Pet Builds are simple and work well early on
  • Shadow Clone & Heavenly Strike plays are not the best because they require a lot of Skill Points
  • Perks are at great value, (Definitely would recommend purchasing with your corrupted diamonds)
  • You can use real diamonds to purchase corrupted diamonds if you think this will greatly help your chances of ranking high
  • Salvaging artifacts are fairly cheap, this can help a great deal if you plan to be actively playing for awhile during the tournament
  • Prestige when you run out of Mana because you can get back up quick and Mana is often an issue
  • Prestige early in the game for relics (push for a bit first though)

Tournament Points

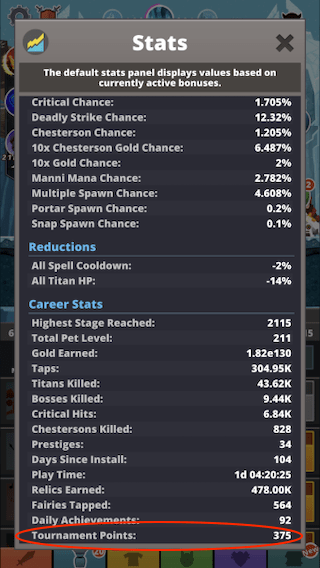
Tournament Points are a unique reward currency. There is no other place to get Tournament Points besides from Tournaments.

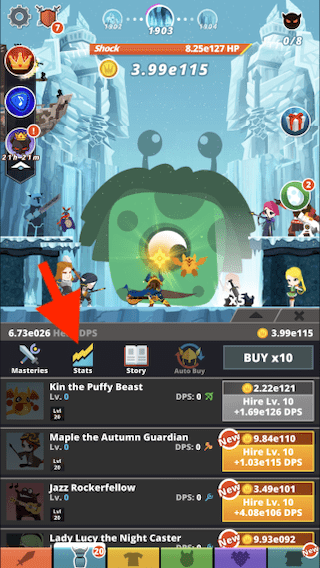
Check your Tournament Points:

tap-titans-2-stats
tap-titans-2-total-tournament-points

What are Tournament Points used for?

Tournament Points are used for upgrading a Passive Skill called “Mystical Impact”. This skill boosts your Sorcerer Splash Skip effect.

These upgrades happen automatically and you will not have to do anything.

If you’ve found this post helpful, have any questions, suggestions, or problems at all, please feel free to comment below.
Tap Titans 2 Heroes

Tap Titans 2 Heroes

Tap Titans 2 Heroes

In Tap Titans 2, hiring heroes to help you is essential! As a team, you and your heroes work together to defeat titans.

Your character (The Sword Master) is the leader to all these heroes. Your heroes fight alongside you, using their own special abilities. Heroes do come at a price though, you must have some gold collected to hire them.

All Heroes

Here presents, a complete list of all the heroes:

Hero name
Class
area Type
Maya Muerta, the Watcher
Spell
Ground
Zato, the Blind Staff Master
Melee
Ground
Sophia, Champion of Swords
Melee
Ground
Lance, Knight of Cobalt Steel
Melee
Ground
Pingo of the Tori
Ranged
Ground
Rosabella Bonnie Archer
Ranged
Ground
Gulbrand the Destroyer
Melee
Ground
Captain Davey Cannon
Ranged
Ground
Rhys Mage of Order Evetga
Melee
Ground
Kronus, Bringer of Judgement
Spell
Ground
Cosette, Jewel of House Sabre
Melee
Ground
Kiki, the Dragon Rider
Spell
Ground
Maddie, Shadow Thief
Ranged
Ground
Beany Sprout the 1st
Spell
Ground
Sawyer, the Wild Gunslinger
Ranged
Ground
Lil' Ursa
Spell
Ground
Saje, the Garden Keeper
Ranged
Ground
Wally Wat, the Magician
Spell
Ground
Jayce, the Ruthless Cutter
Melee
Ground
The Great Pharaoh
Spell
Ground
Boomoh Doctor
Melee
Ground
Dex-1000
Ranged
Ground
The Great Madame Cass
Spell
Ground
Lala Quickshot
Ranged
Ground
Aya, the Lightning Violet
Melee
Ground
Lady Lucy, the Night Caster
Spell
Ground
Jazz Rockerfellow
Spell
Ground
Maple, the Autumn Guardian
Melee
Flying
Kin, the Puffy Beast
Ranged
Flying
Princess Titania of Fay
Spell
Flying
Miki, the Graceful Dancer
Ranged
Ground
Mina, the Priestess of Light
Spell
Ground
Yzafa, the Fearsome Bandit
Melee
Ground
Zolom Blaster, Space Hunter
Ranged
Flying
Finn, the Funny Guard
Ranged
Ground
Nohni, the Spearit
Melee
Flying
Damon of the Darkness
Spell
Flying

Masteries

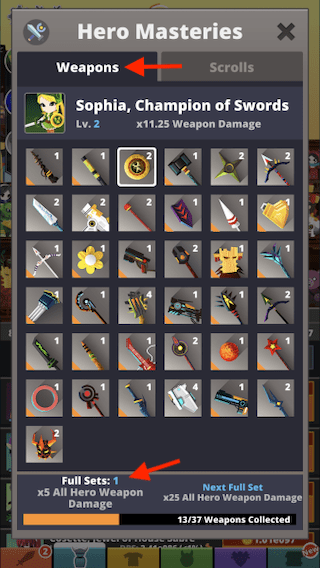
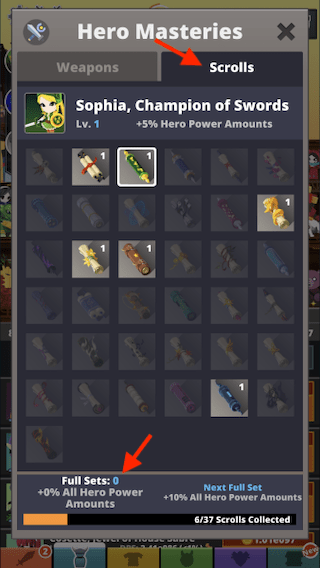
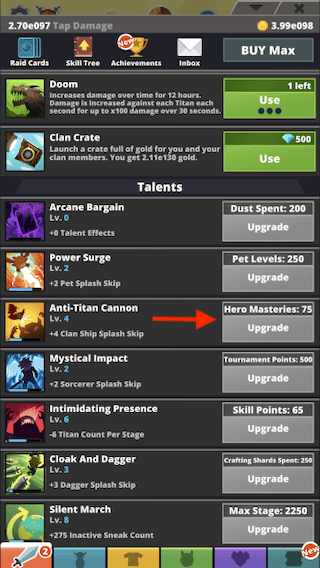
Hero Masteries consist of Hero Weapons and Scrolls. Having full sets of weapons adds a x5 Hero Weapon Damage Multiplier on each hero weapon. For scrolls, each full set increases your hero power by +10%. The more full sets you obtain, the higher damage multiplier/power you will have. Note that the # of full sets you have only increases your boosts linearly. 

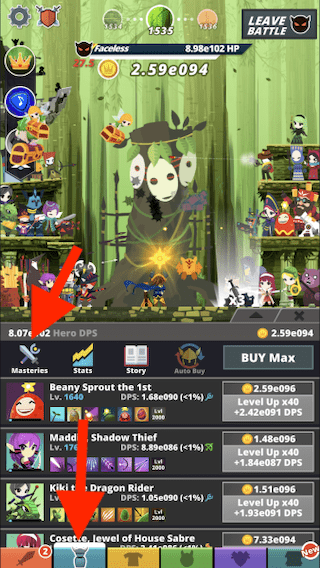
This is how you check your Hero Masteries:

tap-titans-2-hero-masteries-find
tap-titans-2-hero-masteries-weapons
tap-titans-2-hero-masteries-scrolls

Additionally, more hero masteries can help upgrade some of your Talents.

tap-titans-2-hero-masteries-talents

Hero Weapons

Hero Weapons are one part of the Hero Masteries section. Each Hero has their own designated weapon. These weapons can be improved by upgrades causing your heroes to have more attack damage. 

Obtaining Hero Weapons

You can get Hero Weapons by…

  • Participating in Tournaments
  • Completing Daily Quests
  • Purchasing the “Silver Chest” and/or “Titan Chest” from the Shop (using gems)
  • Purchasing Limited Edition Shop Bundles (using real money)

Upgrading Hero Weapons

Upgrading Hero Weapons requires no cost. They will upgrade automatically when you obtain a Hero Weapon duplicate. Hero Weapons basically upgrade in the same way pets do.

There are two types of upgrades

  • First, the Standard Weapon Upgrade. This will upgrade any random Hero Weapon.
  • Then, there is the Fortune Weapon Upgrade. This will upgrade the Hero Weapon that is the lowest level.

Hero Scrolls

Hero scrolls are a bit harder to gain than Hero Weapons. These Hero scrolls increase your overall Hero’s power. Each Hero has their own designated scroll. These scrolls can be upgraded to increase its boosts. Hero Scrolls are the second part of the Hero Masteries Section.

Obtaining Hero Scrolls

To obtain Hero Scrolls, you first must be in a Clan. If you want to learn about Clans you can check out Tap Titans 2 – Clan Fundamentals

Clan Raid rewards give out Hero Scrolls. The better your clan does in a Clan Raid, the more rewards each person in the clan will get. 

Upgrading Hero Scrolls

Upgrading Hero Scrolls follows the same kind of pattern as Upgrading Hero Weapons. There is no cost required and upgrades happen automatically when you get a duplicate of the same scroll.

There are two types of upgrades

  • First, is the Standard Hero Scroll Upgrade. This will upgrade any random Hero Scroll.
  • Then, there is the Fortune Scroll Upgrade. This will upgrade the Hero Scroll that is the lowest level.

The effects of Hero Scrolls can be improved by additionally upgrading the Artifacts, “Quill of Scrolls” and “Old King’s Stamp”.

Hero Classes & Area Type

Heroes are divided by Class and Area Type. Often certain boosts for heroes only amplify heroes of a particular class or area type. That is why it is important to know which heroes are in each section.

Hero Classes

There are no differences in power between each Hero Class unless you get boosts for a certain class.

Classes:

  • Melee Heroes
  • Spell Heroes
  • Ranged Heroes

Area Types

There are no differences in power between each Area Type Hero unless you get boosts for a certain area.

Areas Types:

  • Flying Heroes
  • Ground Heroes

Hero Skills & Evolving

Not only do heroes attack the Titan enemies with their weapons, they have special skills that work passively + special evolutions.

Hero Skills

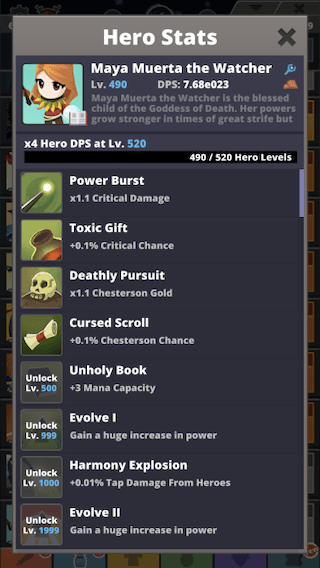
As you upgrade your heroes in game, you can unlock skills at specific level marks. These levels are, 20, 60, 100, 200, 500, 1000, 2000, 3000, 4000, & 6000. View the Hero Stats to see their skills.

tap-titans-2-hero-skills

These skills are great to have, even if the Hero’s DPS (Damage per Second) is low.

Evolving

Heroes can evolve when they’ve reached level 999 and again when they’ve reached level 1999. Evolving your heroes will give them a massive boost in DPS so that their attacks are more effective towards the Titans.

Hero Upgrade Tips

If you are tired of tapping every time to upgrade your heroes, there are a couple things you can do to make your game play easier.

Upgrading more Levels per tap

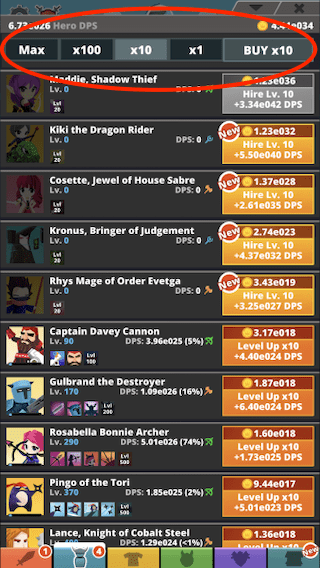
You are able to upgrade more hero levels per time for completely free! This is how…

tap-titans-2-upgrade-x10

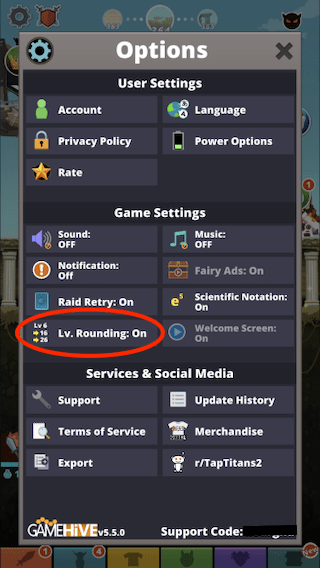
You can also head to your main settings and turn “Level Rounding” on if you like to keep things even just like me. wink

tap-titans-2-level-rounding-on

Auto-Upgrades

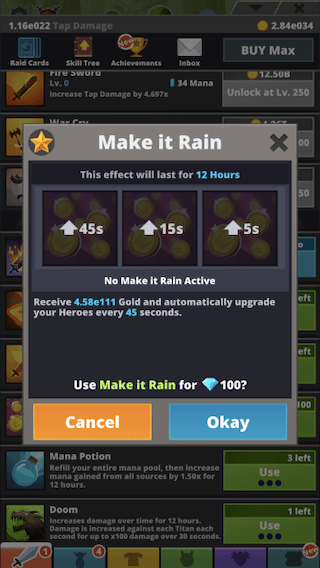
Auto-Upgrades will automatically level up your heroes after a certain amount of time. You get these Auto-Upgrades by buying the “Make it Rain” perk for 100 gems. This perk will last for 12 hours.

If you buy the perk 1 time, your heroes will Auto-Upgrade after 45 seconds.

If you buy the perk 2 times, your heroes will Auto-Upgrade after 15 seconds.

If you buy the perk 3 times, your heroes will Auto-Upgrade after 5 seconds.

You will still receive the Gold benefits of the “Make it Rain” Perk and the amount of Gold you receive depends on your own level.

tap-titans-2-auto-upgrades

If you’ve found this post helpful, have any questions, suggestions, or problems at all, please feel free to comment below.
How to have No Name in Among Us (2021)

How to have No Name in Among Us (2021)

How to have No Name in Among Us (2021)

If you are wondering how to have no name in Among Us (AKA an invisible Among Us Name), you’ve come to the right place.

Learn Step by Step how to have No Among Us Name in game play!

Why it is good to have No Among Us Name

Having a Blank Among Us Name may seem bizarre, but that’s is just why it’s so fun!

Some reasons you may want a Blank Among Us Name…

Trolling! Sometimes, us gamers love to troll. Using a Blank Name is such a fun and creative way of trolling the other Among Us players. They will surely be shocked to see an Among Us player with.. No Name?!

Hiding your Identity! If you have No Among Us Name, no one will know who you really are. No one will have a clue…

Aesthetics! There are times that you look at a gamers name and think to yourself, “What made them inclined to pick this long name”? Occasionally, it is just best to go with the eye-pleasing Blank Name.

Can’t think of a good Name? When you can’t think of a good Among Us Name, just go with no name at all. tongue-out

Can you have a blank Among Us Name on PC and Mobile Devices?

It does not matter what device you are using to play Among Us.  

There is a simple way to have a Blank Name on Among Us no matter your electronic. 

Step by Step Guide on having No Among Us Name

*Update, you can no longer have a Blank Among Us Name as of 2021. We will update this post as soon as we find a way to have a Blank Among Us Name Again*

Step #1.

Copy the Blank Text below. You will not be able to see the text because it is invisible, but there should be a copy button.

Copy Invisble Text Here Below ⇩

Step #2.

Now, head to the Among Us Game App. If you are on Mobile it is important to copy the invisible text before logging on Among Us. This is because you cannot multitask between tabs when playing Mobile Version of Among Us.

among-us-app-logo

Step #3.

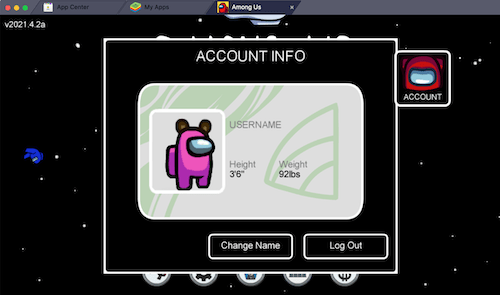
After logging onto Among Us, you want to click on your Account.

*example pictures will be shown on BlueStacks*

among-us-account

Step #4.

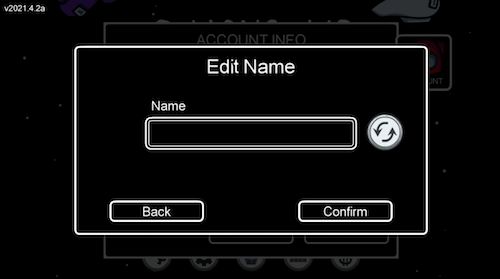
Simply, edit your name by pasting the invisible text in.

among-us-edit-name

Step #5.

You should see that your name is fully invisible!

among-us-invisible-name

Step #6.

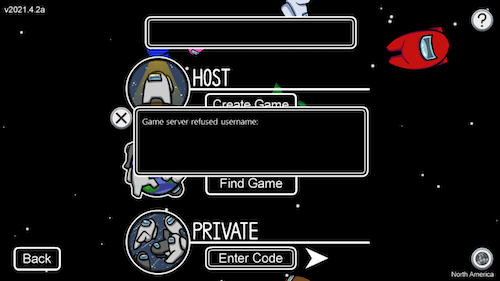
Lastly, you can now join or create an Among Us Game with your new name!

Unfortunately, recent updates have caused stricter name restrictions, so this no longer works.

join-among-us-game-with-invisible-name

Keep up with Among Us Updates!

Among Us has many updates and a hard working staff! To get these updates as soon as possible, consider doing the following…

 Join the Official Among Us Discord Server to see game updates and chat with the community!

Check out the Among Us Tweets too!

If you’ve found this post helpful, have any questions, suggestions, or problems at all, please feel free to comment below.
53 Minecraft Tips and Tricks That Will Make You A Better Survival Player

53 Minecraft Tips and Tricks That Will Make You A Better Survival Player

53 Minecraft Tips and Tricks That Will Make You A Better Survival Player

Whether you’re absolutely new to the game or consider yourself an advanced Minecraft player, this helpful resource is filled with tips, tricks, and strategies that will assist you in dominating the Minecraft world.

While reading through this post if you happen to think of something useful comment about your thoughts so that we can share your ideas with other Minecraft Players!

Useful Minecraft Tips, Tricks, and Strategies

  • Using lava to cook food or smelt items
  • Storing valuables in an ender chest
  • Using gold nuggets to create golden healing food
  • Making a sugar cane farm
  • Replant trees after gathering wood
  • Creating double chests
  • Mining around a diamond block first
  • Always place torches on your left-hand side while exploring caves
  • Farming hay bales as you see them
  • Taking on iron golems for iron
  • Using food items that have higher saturation levels
  • Always keeping a flint & steel on you
  • Knowing when to use coal blocks instead of individual coal
  • Crafting a bucket as soon as possible
  • Preserving the bottom block of the tree when farming wood
  • Organizing resources
  • Sleep at least every 3 days
  • Lifting up your surrounding area
  • Mob proof your base
  • Creating a farm powered by villagers
  • Building zombie/skeleton farms around spawners
  • Trading with Piglins
  • Creating a villagers trading hub
  • Using fences instead of doors
  • Carrying different potions with you depending on what you’re doing
  • Find as many totems of undying as you can
  • Creating different sets of armor
  • Fishing for enchantment books
  • Using fortune iii when mining diamonds
  • Never make golden equipment
  • Knowing when to use different enchantments
  • Knowing what ores to use silk touch for
  • Making backup equipment sets
  • Making a shield
  • Equipment before building projects
  • Using a lodestone in the nether
  • Leaving a resource trail in the nether and end city
  • Wearing at least one piece of gold armor in the nether
  • Using beds to fight the ender dragon
  • Using melee combat on the dragons head
  • Build around your portal in the nether
  • Writing down your default spawn location
  • Making your base near your default spawn location
  • Calling a village home especially at the start of your Minecraft journey
  • Having a beacon close to your base
  • Learning how to use Redstone
  • Building large projects in a creative world first
  • Crouch while walking near edges
  • Don’t dig straight down staircase mine instead
  • Attacking with critical hits
  • Playing with friends
  • Playing for fun

Storage and Resource Tips

Get the most out of your Minecraft Resources by using these helpful tips below to manage, organize and utilize your Minecraft resources.

Using Lava to cook food or smelt Items

When you’re in a situation where you want to save your coal for torches instead you should consider using Lava to smelt or cook your items. This is especially useful while in the Nether.

Storing Valuables in an Ender Chest

An Ender chest is like Cloud Storage. You can store your valuables within them and access them from another Ender Chest in a completely different location. Storing your most prized possessions and useful items that you might need after never having thought about bringing them along within an Ender Chest can end up being a real-life saver.

Using Gold Nuggets to create Golden Healing Food

Gold isn’t very useful as tools because the durability is extremely low. This will break your tool in a matter of mining a few blocks. Using your Gold on Food items is a totally different story though.

Making a Sugar Cane Farm

Sugar cane is a very important resource. This is especially true in the late game once you’ve obtained an Elytra. While it is not necessary to make sure you have an Automatic sugar cane farm you should always for the very least bone meal farm Sugar cane. You should also remember to keep at least one Sugar can somewhere safe so that you can make tons out of that one if you ever needed to.

Replant trees after gathering wood

Whenever you’re gathering wood you should always make it a habit to replant trees. This will leave your world looking clean and natural. It also allows you to maintain your wood farming location without having to go further and further out each time. Besides… it’s always a good idea to stay eco-friendly.

Creating Double Chests

It is no secret that a double chest is at least twice as good as a single chest. Using a Double chest to store Shulker boxes in them can save you a lot of Room.

Mining Around a Diamond Block First

You should always consider mining around a Diamond Block before ever taking the actual Diamond. This will ensure that there is no lava beneath the Diamond Block, and will save you from dealing with the traumatic experience it is to have your newly found Diamond burn up infront of your very eyes.

Always Place Torches on Your Left-hand Side While Exploring Caves

Whenever you enter a cave, make sure to always place a torch on the left side of the cave. This will ensure that whenever you need to leave the cave torches will always be on your right-hand side. Allowing you to always keep track of where you are whilst making sure you don’t get lost.

Farming Hay Bales as You See Them

Most players ignore Hay Bales while passing through villages. This means they’re leaving behind 9 Pieces of Wheat for each Hay Bale they pass. Always make sure to collect this valuable resource.

Taking on Iron Golems for Iron

If you don’t already have a full-fledged Iron Farm, it’s sometimes a good idea to take on Iron Golems with your sword. An easy way to do this is by attacking an Iron Golem, running to a safe area, and simply building up at least 3 Blocks. This will ensure that the Iron Golem does not have the reach to attack you, while your sword can reach that far. When an Iron Golem is defeated, Iron will always drop.

Using Food Items That Have Higher Saturation Levels

Different food items have different saturation levels. This means that if you consume a certain food, for example, meat, your hunger bar will go down at a slower level compared to eating something else.

Always keeping a Flint & Steal on you

Having a flint and steal with you at all times is a great idea. You’ll be able to make portals wherever you are, as well as use the flint and steal to attack Cows/Pigs/Sheep before finishing them off with your sword giving you cooked pieces of meat. This saves you from having to find a furnace and some coal just to have a meal.

Knowing When to Use Coal Blocks Instead of Individual Coal

Depending on what exactly you need to have smelted or cooked, knowing whether to use a coal block or an individual coal piece is very helpful. It takes 9 Coal pieces to craft a Coal block, however, one coal block can last a lot longer. Only use a Coal Block if you have a lot of items that need to be smelted or cooked.

Crafting a Bucket as Soon as Possible

Buckets are really important. They can be used to transfer both Lava and Water as well as some fish that reside in the water. Whenever you fall off a cliff a water bucket can save you. Whenever you’re desperate for large amounts of furnace power, a Lava bucket can aid you.

Preserving the Bottom Block of a Tree When Farming Wood

Whenever you’re cutting down a tree, make sure to preserve the Bottom Block for last. This will enable you to hop on to it and reach any blocks that you wouldn’t otherwise be able to reach.

Organizing Resources

At first, you may not need to organize your resources, but over time having too many resources in random chests can become overwhelming, and thus making it difficult to sort through and find whatever you may need at the time. Having a dedicated chest for each useful resource will allow you to always find the items you need whenever you need them.

Passive and Hostile Mobs Tips

Here are some promising tips and tricks that you should take into consideration. These tips are focused on Passive and Hostile Mobs.

Sleep at Least Every 3 days

Legend has it that if you don’t sleep for 3 days, Dangerous creatures will soar above you… These Mobs are known as Phantoms. The lesson that should be taken here is to sleep at least once every 3 days.

Lighting up your Surrounding Area

Lighting up the area that surrounds you is an essential part of staying safe. As you may already know, zombies can spawn anywhere that isn’t lit up correctly. So make sure to light up the areas you are in… unless you are looking to make a Zombie your Life Partner.

Mob Proof your Base

Mob proofing your base is always a great idea. You don’t ever want a Creeper to end up spawning in your base and blowing up all of your hard work.

Creating a Farm Powered by Villagers

Villagers can be extremely handy for many situations. One of these situations includes building and maintaining a Farm that is powered by Villagers. This type of farm can be any farm of your choosing including; Wheat/Bread, Carrots, Beatroot, and Potatoes. However, I highly recommend and personally have a Wheat/Bread farm… AND YES! Villagers can produce bread. 

Building Zombie/Skeleton Farms around Spawners

As a new player, it may be tempting to just destroy every spawner you see to get the XP that comes with it while making sure Zombies won’t ruin your day. Unfortunately, as you become a more experienced player you realize the value that comes with transforming that spawner into a Zombie or Skeleton Farm instead.

Trading with Piglins

Piglins love gold. They love Gold so much that if you drop a Gold Ingot in front of them, they’ll pick it up, and throw something else back at you in return. This could include Ender Eyes…

Creating a Villager Trading Hub

Another scenario where Villagers prove to be useful includes trading with them. Trading with Villagers can quicken your speed run or allow you to gather the very rare Emerald resource to your heart’s content.

Using Fences Instead of Doors

Using Fences in place of Doors has been and probably will always be the go-to move when trying to keep Zombies out of your Survival Home. Zombies can break through doors easily over time but for some reason cannot seem to find a way through a fence. Using a fence instead of a door will ensure your safety.

Equipment, Potions and Enchantment Tips

Below you’ll find great tips for Equipment, Potions, and Enchantments. Make sure to remember these tips!

Carrying Different Potions With You Depending on What You’re Doing

Potions are highly useful. Carrying different Potions with you depending on what you’re currently doing will make your Minecraft journey a whole lot easier. An Example of this would be carrying a fire resistance Potion when you’re in the Nether.

Find as Many Totems of Undying as You Can

Always claim as many Totems of Undying as you can possibly find. These Totems can quite literally save your life as well as save you from the pain of losing items from dying in lava.

Creating different Sets of Armour

You should always consider creating different sets of Armour with different Enchanments on them. Sometimes you may need to traverse through an Ocean Monument and other times you might need Feather Falling Enchanted Boots to prevent death after a Shulker attack.

Fishing for Enchantment Books

When you first acquire a fishing Rod it might be a good idea to fish for Enchantments, for some reason many players don’t actually fish for items and I honestly have no idea why. It’s one of the easiest ways to get Enchantments, Enchanted Bows as well as food.

Using Fortune III When Mining Diamonds

Whenever you’re mining any valuable resource you should always make sure to use Fortune III. A player using the Fortune III pickaxe to mine Diamonds will end up with significantly more Diamonds than a player who doesn’t.

Never Make Golden Equipment

Just no. I said No.

Knowing when to use different Enchantments

All enchantments are good in their own way. Knowing when to use different Enchanted Equipment is the key to having a successful journey.

Knowing What Ores To Use Silk Touch For

Knowing what Ores to use Silk Touch for can be very useful information. An ore that you might consider using a Silk Touch pickaxe to mine is Nether Gold Ore. When mining Nether Gold Ore with a Silk Touch pickaxe you’ll obtain the block itself and you can smelt this block in a furnace to extract a Golden Ingot.

Making Backup Equipment Sets

Creating a backup equipment set might at first seem like a waste of resources. However, if you ever manage to get completely decimated by a horde of Zombies, you might never be able to get your equipment back… unless you’ve made that backup Equipment set. Trust me, i know.

Making a Shield

A shield can also be very useful. Whenever a Mob with an Axe attacks a player that uses their shield, the mob will get stunned for a few seconds. Shields are also great against Skeletons and their deadly arrows.

Equipment Before Building Projects

While playing Minecraft you may become infatuated with the idea of taking on an insanely huge building project. However, this type of thought should be left for after you’ve acquired good gear. Having better equipment will allow you to Mine and gather the resources you need a lot faster and thus making it that much easier to take on Bigger and Better projects.

Nether and End City Tips

Here are some great tips that will help you traverse and navigate both the End City and Nether effectively.

Using a Lodestone in the Nether

Maps do not work in the Nether. Therefore, the best option to track the locations that you want to track is by using a Lodestone. The only problem with this is that you need to find some Netherite first.

Leaving a Resource trail in the Nether and End City

While traversing through the Nether and End City you may end up getting lost. This is why it’s always a fantastic idea to leave a trail of any block of your choosing. So that if you do end up getting lost.. all you’d have to do is follow the trail you’ve left. While you’re at this don’t forget to make up your bed too, so that if you do happen to have a bad day, you’ll go home to a bed that is made… made by you.

Wearing at least one piece of Gold Armour in the Nether

It is no secret that Piglins are in love with Gold. If you wear a Gold piece of armour Piglins will start to see you as one of their own. This will allow you to pass by them easily without getting attacked.

Using Beds to Fight the Ender Dragon

As you may have noticed, many speedrunners use Beds to end the Ender Dragon. Beds Explode when a player tries to sleep in one while in the End City. You can use this to your advantage by blowing up the Bed whenever the Ender dragon is near.

Using Melee Combat on the Dragons Head

Attacking the Ender Dragon with your sword just doesn’t cut it anymore. If you want to End that Ender Dragon fast, try aiming for the head as this deals more damage than a strike anywhere else.

Build around your Portal in the Nether

When entering the Nether, the very first thing you should always do is build around your Portal. This will prevent Ghasts from turning the portal off, which would leave you in a very sticky situation.

Bases and Building Tips

Take these useful Building tips into consideration so that you can focus on the fun around Building in Minecraft without having to face these issues.

Writing down your default spawn location

Writing down your default spawn location is a good thing to do. This way whenever a friend joins your world you know exactly where they’ll end up spawning.

Making your Base Near your default spawn Location

Creating your base extremely far away from your default spawn location can become a huge hassle. Every time you end up dying without having set your spawn point you’ll have to travel miles and miles just to pick up where you left off.

Calling a Village home especially at the start of your Minecraft journey

A great place to live when you first start playing Minecraft is within an existing Village. You’ll have access to a lot of good resources and the ability to trade with villagers as soon as you’re ready to do so. Living in a village will give you access to a free bed, some food, and if you’re lucky even a couple of Work Stations.

Having a Beacon close to your base

Having a Beacon close to your Base is a great idea. This way whenever you’re traveling home you’ll know for sure you’re on the right path having that beautiful beam shooting upwards through the sky.

Learning how to use Redstone

Redstone is an essential part of Minecraft. It allows you to build automatic machines that can take you places, and other machines that can farm useful resources without you having to do anything at all. There are tons of resources out on the web related to Learning Redstone. All you have to do is search for whatever you need help with.

Building Large projects in a creative world first

Whenever you’re taking on a Large Building Project, it is better to start out in a creative world. It will save you a lot of time from having to realize you didn’t want this in your survival world in the first place, or that you’ve made a huge mistake somewhere within your plan. It takes a lot less time to build in creative mode. You’ll also know exactly what resources you’ll need if you do plan to take on your project in a Survival world.

BONUS TIPS

Here are some Bonus tips.

Crouch while Walking Near Edges

Whenever you’re walking along an edge it is a good idea to crouch while walking. Crouching while walking locks in your position and can save you from a fall to your death.

Don’t Dig Straight Down, Staircase Mine instead

Consider digging straight down as sinful behavior, you should never dig straight down. Digging straight down may seem like the quickest route from Ground Level to Diamond Level. However, it may end up with you falling to your death or dying in lava. Instead, you should staircase Mine down, this way you’ll have a direct route back up as well.

Attacking with Critical Hits

In Minecraft, in order to do a critical hit the player would need to jump right before swinging their sword. Doing this will deal extra damage and can reduce the amount of time and the number of strikes it takes when taking on Hostile Mobs.

Playing with Friends

Minecraft is fun to play, especially when playing with friends.

Playing for Fun

Always remember that Minecraft is just a game. Don’t take things too seriously. Play for fun and enjoy every moment you spend playing.

If you’ve found this post helpful, have any questions, suggestions, or problems at all, please feel free to comment below.
Pin It on Pinterest