Archon Quests: The Outlander who Caught the Wind – Prologue Act I
This is the first act of the prologue chapter “Archon Quests”. The Act is divided into various sub-quests which the walkthroughs for each of them can be found below.
Quick Links
- Bird’s Eye View
- Unexpected Power
- Forest Rendezvous
- Wind-Riding Knight
- Going Upon the Breeze
- City of Freedom
- Dragon Storm
- Knights of Favonius
- Winds of the Past
- Crash Course
- Sparks Amongst the Pages
Bird’s Eye View
This is a step-by-step guide to help you complete the “Birds Eye View” Quest if you’re struggling.
- Follow the pathway towards the location shown on the top left on the Map.
Along the way you’ll see a tree with Sunsettia Fruits growing and surrounding the tree, you should pick these up as they are used to recover lost HP. - Go to Paimon
Once you head over to Paimon a cutscene will begin displaying the location of one of the Statues of The Seven. - Follow Paimon
Now continue to follow your guide Paimon until you reach Starfell Lake. - Swim to the island in Starfell Lake
Once you reach the destination, all you’re going to have to do is walk towards the lake, your character will begin to swim. Continue swimming all of the way to the island where Paimon now awaits you, but be careful if you run out of stamina you will drown.
Once you arrive a cutscene will begin and you’ll obtain the power of the Anemo Archon and the Birds Eye View quest will now be completed.
 |
 |
 |
| 500 | 225 | 975 |
Unexpected Power
This is a step-by-step guide to help you complete the “Unexpected Power” Quest if you’re struggling.
A couple of Pyro Slimes will appear, you can defeat these enemies by simply using the Anemo power you just obtained.
- Talk to Paimon
- Defeat the Slimes
- x9 Pyro Slime will appear.
- Click “E”/Tap to unleash Elemental Skill
- Hold Elemental Skill
- Use Elemental Burst
Press “Q” to use your Elemental Burst
 |
 |
 |
 |
 |
 |
| 575 | 20 | 250 | 10 | 1100 | 10 |
Forest Rendezvous
This is a step-by-step guide to help you complete the “Forest Rendezvous” Quest if you’re struggling.
- Go to Mondstadt
Your first objective is to head over to Mondstadt, while on your journey towards the city your quest will be interrupted by another. - Advance to the heart of the forest
Once you reach the destination a cutscene will begin. - Investigate what Paimon has found
Head over to the shiny red object (Crimson Crystal) that Paimon has discovered. Once this step is done the quest will be marked as completed and you will receive the rewards listed below.
 |
 |
 |
| 575 | 250 | 1100 |
Wind-Riding Knight
This is a step-by-step guide to help you complete the “Wind-Riding Knight” Quest if you’re struggling.
- Keep heading towards Mondstadt
While heading towards Mondstadt your quest will be interrupted yet again, this time by Amber. After the cutscene, you’ll unlock Amber to use as a playable character in your party.
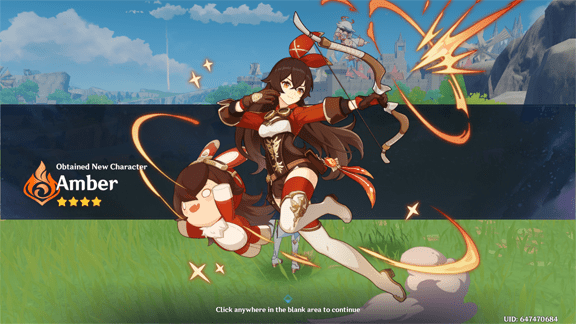
- Use Amber to defeat the airborne slimes
Simply switch the character you’re in control of to Amber, you can do this by clicking “2” on your keyboard since Amber will automatically be the second character in your party. Then aim at the airborne slimes by pressing “R” to switch to aiming mode. - Go to the location designated by Amber
This will be the location of yet another Waypoint, simply unlock it so that you can warp to this location if you ever need to in the future.
 |
 |
 |
| 625 | 275 | 1200 |
Going Upon the Breeze
This is a step-by-step guide to help you complete the “Going Upon the Breeze” Quest if you’re struggling.
- Defeat the nearby Hilichurls
- Clear out the nearby Hilichurl camp
- Hilichurl ×3
- Hilichurl Shooter ×1
- An Exquisite Chest will unlock after defeating the Hilichurls.
- A cutscene will Begin
- Keep heading towards Mondstadt
Once you arrive a cutscene will begin and the quest will be marked as complete.
 |
 |
 |
 |
 |
 |
| 925 | 20 | 275 | 8 | 1800 | Recurve Bow |
City of Freedom
This is a step-by-step guide to help you complete the “City of Freedom” Quest if you’re struggling.
- Go to the location designated by Amber
- You will receive a Wind Glider as a gift from Amber and a tutorial run on gliding.
- Meet Amber at the fountain plaza
You will receive the rewards listed below, A Cutscene will begin and the next Quest will start automatically.
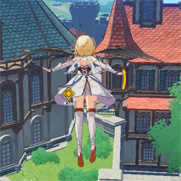
 |
 |
 |
 |
| 850 | 250 | 7 | 1625 |
Dragon Storm
This is a step-by-step guide to help you complete the “Dragon Storm” Quest if you’re struggling.
- Fend off Stormterror
- You will be taken to an aerial battle where all you have to do is shoot Stormterror until his health falls to about 20%, and then the battle will end as he flees.
- Go to the Knights of Favonius headquarters
While you’re on your way to the headquarters I suggest that you unlock the Teleport Waypoint at the top of the headquarters.
 |
 |
 |
 |
 |
| 1250 | 275 | 2 | 20 | 2400 |
Knights of Favonius
This is a step-by-step guide to help you complete the “Knights of Favonius” Quest if you’re struggling.
- Enter the Knights of Favonius headquarters
Simply walk up towards the door and hit the “F” key on your keyboard to enter the building. - Talk to Jean
After the cutscene, you’ll unlock 3 new Quests all related to this Act. You can complete them in any order that you like.
 |
 |
 |
 |
| 1025 | 225 | 9 | 1950 |
Winds of the Past
This is a step-by-step guide to help you complete the “Winds of the Past” Quest if you’re struggling.
- Meet Amber at the temple
- Talk to Amber
- Enter the temple
Simply walk up towards the temple and press the “F” key to enter.- The story domain for this quest is Deep Within the Temple of the Falcon.
- You will gain additional rewards for completing this domain.


3 150 3 10 - Amber will join you as a 5th trial playable character if you have 4 other characters set up.
- Explore the temple’s depthsUse the console to open the doorUse Ambers Pyro Ability to burn the Dendro Vines on the right blocking your path to a chest and on the left preventing you from traveling deeper into the domain.
As you head on further you’ll notice more Dendro Vines, ignite these as well to continue.
A door of Resurrection will Activate as soon as you’re in range of it, this is where you’ll respawn if you happen to fail the challenge by dying.
You’ll then have to defeat a Hilichurl with a shield, you can ignite the shield using Ambers Pyro Ability. After this Hilichurl is defeated, 2 more will appear.
The chest will now be unlocked.
If you turn around you’ll notice more dendro, using pyro on it will reveal a secret chest.

After this, you can head on over to the next room where you’ll find 4 more Hilichurls awaiting you. Defeat them to unlock the chest and the door leading to the next room.
Now you have to activate the Pyro Monument. In order to Activate it simply use Ambers Pyro Ability by holding down left click and aiming at the Pyro Monument.

A wind current will then form. Use the glider to ride the wind current. If you take a look back towards the previous room you’ll notice a chest above the previous room you were in. Glide down there first then come back to the wind current to continue the quest.

- Destroy Stormterror’s crystal in the Temple of the Falcon
A cutscene will then begin. - Collect the Reward Then leave the domain.
 |
 |
 |
 |
 |
| 1550 | 275 | 3 | 3000 | 20 |
Crash Course
This is a step-by-step guide to help you complete the “Crash Course” Quest if you’re struggling.
- Meet Kaeya at the temple
- Talk to Kaeya
Simply press the “F” key on your keyboard
A cutscene will begin - Enter the temple
- Simply press the “F” key on your keyboard to enter
- The story domain for this quest is Deep Within the Temple of the Wolf.Start the domain by clicking “Start” after selecting the characters you will use.
- Talk to Kaeya
- Kaeya will join you as a trial character.
- Explore the temple’s depthsA door of resurrection will activate.Defeat the Hilichurl Fighters.
Once you’re done take note that there is a hidden chest in the same room you just defeated the Hilichurls behind some Boxes.
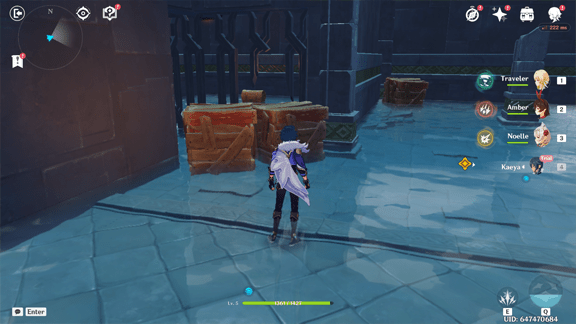
Press onwards to activate the next door of resurrection.
In order to move forward, you’ll need to use Cryo on the flamethrowers to disable them.
You’ll then be able to collect the next chest.
After collecting the chest 2 Hydro slimes will spawn, defeat them and then disable the next flamethrower.
Fly up the wind current and activate the next door of resurrection.
Use the console to open up the door and defeat all of the enemy Pyro Slimes within the next room to get yourself a Precious Chest.

Once you make it to the next room, use Cryo to freeze the water so that you can cross over the Spikes in the water. At the end, you’ll be able to activate yet another door of resurrection.
- Destroy Stormterror’s crystal in the Temple of the Wolf
- Leave the temple
Sparks Amongst the Pages
This is a step-by-step guide to help you complete the “Sparks Amongst the Pages” Quest if you’re struggling.
- Meet Lisa at the Temple
- Talk to Lisa
Click “F” on the keyboard to speak to Lisa - Enter the temple
- The story domain for this quest is Deep Within the Temple of the Lion.
- These are the Rewards you’ll obtain from completing the Domain.
- Click “F” on the keyboard to enter the Domain, then click “Start”
- Talk to Lisa
- Lisa will join you as a trial character.
- Explore the temple’s depthsRight at the beginning of the domain, before encountering any enemies there will be a hidden chest behind some boxes.
 Make your way up the windcurrent.
There will be another hidden chest behind some boxes on the right side.

Now activate the door of resurrection and use the console to unlock the door.
A Pyro slime will be in the next room, defeating it unlocks the door.
Once you’re in the room with the Electro Monument, make sure to check the space to the left side where you’ll find yet another hidden chest.

Use Electro to activate the Electro Monument
Once it is activated, 4 Pyro Slimes will appear which you’ll need to defeat within the 20 second time limit. After which you can collect the chest.

Defeat the Hilichurls in the next room to unlock another chest and the door to the next room.

Ride the windcurrent up to reach the next room. Activate the door of resurrection and open the hidden chest on the right hand side behind the boxes.

Defeat the Large Hydro Slime and accompanying Hilichurls.
Travel across the floating platform
Activate the Console to form a pathway.
Then travel up the windcurrent and cross the next floating platform.
Activate the final door of resurrection
- Destroy Stormterror’s crystal in the Temple of the Lion
- Leave the temple
If you’ve found this post helpful, have any questions, suggestions, or problems at all, please feel free to comment below.




 Protected by Patchstack
0 Comments