Brawl Stars Brawler Tier List

Brawl Stars Brawler Tier List

Brawl Stars Brawler Tier List

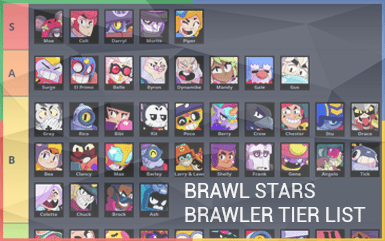
In the fast-paced world of Brawl Stars, choosing the right Brawler can significantly influence your gameplay and overall success. With a diverse roster of characters, each equipped with unique abilities and playstyles, understanding the current meta is crucial for both beginners and seasoned players. This tier list categorizes the Brawlers based on their performance, utility, and effectiveness across various game modes. Let’s dive into the current Brawler tier list!

S Tier: The Powerhouses

Brawlstars Brawler 2d Image Meg

Meg

Content to work behind the scenes with her trusty mecha suit, Meg takes care of real problems, while Max and Surge are out entertaining the crowds.
Brawlstars Brawler 2d Image Mortis

Mortis

“Mortis had grand designs built around being a mortician and a vampire, but the fact that nobody is dying at Starr Park has put a huge damper on his plans.”

Brawlstars Brawler 2d Image Gale

Gale

“Gale’s job is to use his snowblower to clear the areas around Mr. P’s Snowtel. Nobody mentioned anything about stopping when the guests were around…”

Brawlstars Brawler 2d Image Colt

Colt

“Colt is the star attraction at Starr Park! His good looks, charisma and gun twirling tricks win over any audience, except maybe Shelly.”

Brawlstars Brawler 2d Image Darryl

Darryl

“Darryl put on the pirate captain’s hat in a bid to avoid work, but now he’s forced to defend his ship! Who knew being in charge took actual effort?”

Brawlstars Brawler 2d Image Piper

Piper

“Piper wants nothing more than to be the local village baker who hands out pies, cookies and other sweet treats! Just don’t ask about her past.”

Brawlstars Brawler 2d Image moe

Moe

“Moe is a blind rat, found living in the Starr Park sewers by Grom, who then quickly adopted him! Now part of Starr Park’s maintenance team, Moe uses his special digging machine, Driller, to traverse the sewer tunnels… and also cause a bit of destruction throughout the park, much to Ash’s dismay.”

A Tier: Strong Contenders

Brawlstars Brawler 2d Image Griff

Griff

“Griff acts like a rich, successful entrepreneur, but his only business is the failing Starr Park Gift Shop. Oddly, he’s never around when the bank calls.”

Brawlstars Brawler 2d Image Chester

Chester

“Chester makes vicious fun of anyone in sight, trying to get under their skin. The more hate he gets, the better… especially if that hater is Mandy!”

Brawlstars Brawler 2d Image Surge

Surge

“Surge is souped-up soda fountain, always ready to get the party started! He’s got the beats, the moves, and an endless supply of energy drinks.”

Brawlstars Brawler 2d Image Belle

Belle

“The leader of the notorious Goldarm Gang, Belle is after more than money. She wants to find out the truth behind Starr Park and bring it down!”

Brawlstars Brawler 2d Image Rico

Rico

“Rico is definitely a real space bounty hunter who tracks down the galaxy’s most wanted criminals, not a gumball machine pretending to be cool.”

Brawlstars Brawler 2d Image Byron

Byron

“Byron has invented many concoctions and tinctures that heal or harm in various ways…. but most of them fall into the harming category”

B Tier: Reliable Choices

Brawlstars Brawler 2d Image clancy

Clancy

“There’s no turning back with Clancy (unless Hank orders him to). He’s fully embraced his fake crustacean life and will do anything for his comrades.”

Brawlstars Brawler 2d Image berry

Berry

“Working at Mandy’s Candy Shop, what could go wrong? EVERYTHING! Luckily, Berry has the patience and toughness of a workhorse. He seems to hate every second of his job, but at the end of his shift, you might catch a brief smile.”

Brawlstars Brawler 2d Image Bea

Bea

“Bea spends her day watching bugs as they go about their lives, imagining what they’d say if she could understand them… or even what it’s like to be one.”

Brawlstars Brawler 2d Image Colette

Collette

“Colette has collected every single figurine, plushie, and toy of every single Brawler. Is she obsessed? Yes. But has she lost touch with reality? Also yes.”

Brawlstars Brawler 2d Image Lola

Lola

“Lola makes sure everyone knows when she enters a room. She’s an expert in the fine art of causing a scene to get what she wants, and she’s proud of it!”

Brawlstars Brawler 2d Image Leon

Leon

“Since Leon doesn’t like hanging with other people much, his ability to become invisible comes in handy. Only his little sister, Nita, seems to get through to him.”

Brawlstars Brawler 2d Image Carl

Carl

“Carl is a mining robot who’s fascinated by rocks and stones of all kinds. Don’t let him get started on his latest obsession: the effects of Gems!”

Brawlstars Brawler 2d Image Gray

Gray

“Gray styles himself as a character in an old silent film. He takes the act seriously but sometimes forgets to keep his mouth shut when doing finger bullets.”

Brawlstars Brawler 2d Image Kit

Kit

Stuck giving autographs to his rabid fans at Starr Toon Studios, cartoony superstar Kit often daydreams of becoming relevant in the industry again, respected for his acting chops rather than his looks.

Brawlstars Brawler 2d Image Sandy

Sandy

“On the rare occasions Sandy wakes from his slumber, he tries to help his big sister Tara around their store. But it’s never long before he falls asleep again.”

Brawlstars Brawler 2d Image Buzz

Buzz

“Buzz is a lifeguard at the Velocirapids water park and a real stickler for the rules. He clearly enjoys wielding the tiny bit of authority he has to the greatest degree possible.”

Brawlstars Brawler 2d Image Jessie

Jessie

“Jessie is a prodigy who builds guns and gadgets from parts she finds in the junkyard. Maybe one day her mother Pam will see she can fend for herself!”

Brawlstars Brawler 2d Image Barley

Barley

“A bartending robot designed to mix drinks and banter with patrons, Barley also makes sure to keep his bar clean, to the detriment of anyone who makes a mess.”

Brawlstars Brawler 2d Image Stu

Stu

“A little punch-drunk from too many bumps, bruises, and gasoline fumes over his long stunt performing career, Stu is a bit wobbly on his wheel these days.”

Brawlstars Brawler 2d Image Lily

Lily

“A nerd at heart and a total witchcraft buff, Lily’s thirst for knowledge once led her into the Enchanted Woods, where an incident involving a firefly and a carnivorous plant would change her life forever…”

Brawlstars Brawler 2d Image El_Primo

El Primo

“El Primo is always in the spotlight and that’s right where he wants to be! There’s no audience he can’t win over, except maybe his fellow performers…”

Brawlstars Brawler 2d Image Frank

Frank

“Frank is a good-natured giant who helps out at the mortuary by day and spins tunes at the Club by night. He doesn’t get a lot of sleep, and it shows.”

Brawlstars Brawler 2d Image Crow

Crow

“Crow trusts no one and keeps to himself. The most anyone knows about him is that he’s often found at the diner, hanging out with Bull and Bibi.”

Brawlstars Brawler 2d Image Angelo

Angelo

“Angelo is the Love Swamp’s resident cupid-turned-mosquito. They buzz around the canals looking for lovebirds to dazzle with their irresistible charm, even if those require a little extra, pointy incentive.”

Brawlstars Brawler 2d Image Bibi

Bibi

“Bibi is a tough punk with a baseball bat and an attitude to match. She’s a bit of a nerd too, but she’d never show it. She’s got an image to maintain!”

Brawlstars Brawler 2d Image Dynamike

Dynamike

“Dynamike is an old miner and prospector who’s become obsessed with explosions. Nothing makes him happier than a big boom!”

Brawlstars Brawler 2d Image Gene

Gene

“Most people look at Gene and see a funny little guy in a costume. What they don’t see is that his personality is split between his body and his teapot.”

Brawlstars Brawler 2d Image Buster

Buster

“Buster took a film projector from the movie theater where he works so he can play around with it like a prop. It’s dangerous and highly unprofessional!”

Brawlstars Brawler 2d Image Gus

Gus

“Gus looks so much like a ghost child that he’s often mistaken for one. Perhaps fittingly, he’s an enthusiast of all things Supernatural, since he’s too innocent to be scared.”

Brawlstars Brawler 2d Image Mandy

Mandy

“Mandy runs a candy store where she dresses in costume and doles out sweet treats. She’s a little too into the act and rules her candy kingdom with an iron fist.”

Brawlstars Brawler 2d Image Max

Max

“Fuelled by energy drinks, Max speeds to the scene whenever someone needs help. She never sticks around long enough to do much… but she sure is fast!”

C Tier: Average Performers

Brawlstars Brawler 2d Image Jacky

Jacky

“Jacky is a miner who can’t resist mouthing off about her wild work experiences using very colorful language! Luckily, the bad words are drowned out by the noise of her jackhammer”

Brawlstars Brawler 2d Image Chuck

Chuck

“Once a brilliant maestro, now a train conductor, Chuck traded the symphonies of the concert halls for the cacophonies of the Ghost Station, all in the hope of discovering the next big thing in music!”

Brawlstars Brawler 2d Image Nita

Nita

“Nita is a ferocious child who never backs down from a fight! The teddy bear on her head serves as a warning to others: don’t poke the bear.”

Brawlstars Brawler 2d Image Bull

Bull

“Bull isn’t as carefree as he was in his youth, but just because his rowdy days are behind him doesn’t mean he won’t still crush someone who’s asking for it.”

Brawlstars Brawler 2d Image Fang

Fang

“Fang has absorbed so many kung-fu movies he practically lives in one. He’s confident, charming, and never uses his hands if he can kick instead!”

Brawlstars Brawler 2d Image Bonnie

Bonnie

“Bonnie is a bundle of uncontrollable and totally destructive energy. Her dream is to be fired from her cannon, all the way to the moon!”

Brawlstars Brawler 2d Image Draco

Draco

“Riding his inflatable dragon and setting off fireworks, Draco promises a show-stopping finale every night. With his electric guitar blaring and his flame-spewing ride rocking the crowd, he turns the fantasy up to eleven!”

Brawlstars Brawler 2d Image Pearl

Pearl

“Against all odds, Pearl found her way into Belle and Sam’s hardened hearts thanks to her disarmingly warm nature. Besides, who can resist chocolate cookies?”

Brawlstars Brawler 2d Image Sprout

Sprout

“Sprout appears to be a cute gardening robot who helps Rosa around the Biodome, but it’s actually an incubator with arms and wheels for a strange pink seed!”

Brawlstars Brawler 2d Image Bo

Bo

“Bo has survived in the Rumble Jungle for a long time. It’s all the more impressive considering he’s been using toys he got on sale from the Gift Shop.”

Brawlstars Brawler 2d Image Ruffs

Ruffs

“Ruffs is a loyal, highly disciplined space colonel who runs a tight ship and does everything by the book. But deep down, he just wants to be a good boy!”

Brawlstars Brawler 2d Image Janet

Janet

“Janet will do whatever it takes to reach the top! As a bonus, her performing skills come in handy for rescuing her sister Bonnie, whenever she gets into trouble.”

Brawlstars Brawler 2d Image Tara

Tara

‘Tara has seen in the cards that great difficulties lie ahead! But don’t despair… she has a terrific selection of magical trinkets for sale to help with that.”

Brawlstars Brawler 2d Image Spike

Spike

“Most people think Spike is Colt and Shelly’s cute sidekick at the Ranger Ranch. Nobody could begin to guess the depths of his trauma”

Brawlstars Brawler 2d Image Otis

Otis

“Otis is a young street artist on the come-up who works by shooting ink at the walls. Nobody knows his true identity, which only adds to his mystique!”

Brawlstars Brawler 2d Image 8-BIT

8-Bit

“An arcade game famous for its brutal difficulty, 8-Bit always hated its players. Now that it’s missing one of its guns, it’s angrier than ever before.”

Brawlstars Brawler 2d Image Lou

Lou

“Lou is a robot snow cone salesman who’s yet to make his first sale. Being located on a snowy mountain peak might have something to do with that.”

Brawlstars Brawler 2d Image Eve

Eve

“Eve’s purpose in life is to mother and protect her precious babies! She’ll do whatever it takes to find them a good home… preferably in Ruffs’ fur”

Brawlstars Brawler 2d Image R-T

R-T

“R-T is designed to be a helpful information kiosk, but he’s also been given the task of monitoring all activity within Starr Park. For safety reasons, of course.”

Brawlstars Brawler 2d Image Nani

Nani

“Originally a security camera, Nani was modified to keep an eye on Jessie. Unfortunately, she can hardly keep up with the precocious girl!”

Brawlstars Brawler 2d Image Melodie

Melodie

“When it comes to Karaoke, Melodie shows no mercy. Armed with her kawaii looks and devilish set of pipes, she never fails to steal the limelight.”

Brawlstars Brawler 2d Image Brock

Brock

“Brock is a smack-talking video game enthusiast. His big attitude hides a more introverted personality, but he’ll still do whatever it takes to win!”

Brawlstars Brawler 2d Image Cordelius

Cordelius

“Gardener and caretaker of the Enchanted Forest. Obsesses over mushrooms and is hostile towards strangers.”

Brawlstars Brawler 2d Image Amber

Amber

“Amber brings the heat, literally! She’s overconfident about her fire abilities despite being a bit of a klutz. With her, it’s spectacle first, and safety last.”

Brawlstars Brawler 2d Image Poco

Poco

“Poco believes music can change people’s lives. He’s so enthusiastic about it that he never stops playing, even after people ask him to!”

Brawlstars Brawler 2d Image Larry_&_Lawrie

Larry & Lawrie

“Larry sells tickets to Starr Park visitors under the watchful eye of his twin, Lawrie. Larry loves rules, they make life easier! Lawrie doesn’t love rules so much as enforcing them. They make a good team.”

Brawlstars Brawler 2d Image Shelly

Shelly

“Shelly’s the perfect ranger: reliable, tough, and terrific with her shotgun. She never understood why Colt got to steal the limelight…”

D Tier: Struggling Brawlers

Brawlstars Brawler 2d Image Willow

Willow

“Willow works as a gondoliera in the Swamp of Love. She gives couples in search of a romantic evening the creepiest, most unsettling time they could imagine.”

Brawlstars Brawler 2d Image Ash

Ash

“Ash has the thankless job of keeping the park clean. He’s climbed into a trash can to protect himself from broken glass and rat bites. It makes him grumpy!”

Brawlstars Brawler 2d Image Mico

Mico

“Mico’s the sound guy in Brawlywood, but one could be forgiven for thinking he’s actually a celebrity given all the bragging and name-dropping. Hot-tempered and unstable, he cannot take a joke. Don’t ever call him funny…”

Brawlstars Brawler 2d Image Grom

Grom

“Grom is a brawny security guard with one weak point: the flashbacks he gets from his time working at a kindergarten. Those kids were merciless.”

Brawlstars Brawler 2d Image Edgar

Edgar

“Edgar believes nobody understands him. Certainly not his mom, who thinks he’s going through a phase. Only he knows the darkness in his soul is eternal.”

Brawlstars Brawler 2d Image Charlie

Charlie

“Itsy bitsy Charlie, Put on a crazy show, She let down her hair, And made off with all your dough. In came the crowd, It filled up the circus tent, So Charlie weaved away while, Taking every cent!”

Brawlstars Brawler 2d Image Emz

Emz

“Emz supposedly works for her uncle Mortis at the mortuary, but she rarely makes an appearance there. She’s too busy hawking her hairspray brand online.”

Brawlstars Brawler 2d Image Pam

Pam

“Pam handles an enormous workload at the junkyard and always gets it done! It’s just a shame it keeps her away from her daughter, Jessie…”

Brawlstars Brawler 2d Image Mr._P

Mr. P

“Mr. P is in over his head trying to run a hotel. He’s always yelling at his employees to work faster, as if they could understand his gibberish!”

Brawlstars Brawler 2d Image Penny

Penny

“Penny doesn’t care about studying old maps or puzzling over sea shanty riddles. She’s a pirate so she can blow stuff up and grab whatever she wants!”

Brawlstars Brawler 2d Image Rosa

Rosa

“Rosa is a botanist with a strong connection to plants. She’s also a boxer, and won’t hesitate to punch one of her specimens if it goes out of control!”

Brawlstars Brawler 2d Image Squeak

Squeak

“Squeak is a blob of happy energy who loves his creator, Ruffs. He’s a joy to be around, at least if you are unaware that he’s made of dog slobber”

Brawlstars Brawler 2d Image Sam

Sam

“A former factory worker turned wanted member of the Goldarm Gang, Sam is always there to ensure Belle doesn’t go too far on their latest heist!”

Brawlstars Brawler 2d Image Tick

Tick

“Tick follows Penny around like a pet as she plots her next big scheme. He isn’t good for much besides blowing things up, but that’s usually plenty!”

Brawlstars Brawler 2d Image Hank

Hank

“Hank is a one-shrimp, one-tank army on a mission to liberate sea life from kitchens and markets everywhere. Chefs, consider yourselves on notice!”

Brawlstars Brawler 2d Image Maisie

Maisie

“Maisie works as a safety coordinator, but deep down she enjoys dangerous situations. Sometimes, it almost feels like she has a hand in creating them.”

Brawlstars Brawler 2d Image Doug

Doug

“Doug’s hot dogs will extend your friends’ shelf life.”

What is Tempo in Chess?

What is Tempo in Chess?

What is Tempo in Chess?

What Is Tempo in Chess?

Tempo is a fundamental concept in chess that often goes unnoticed by beginners but is critical for more advanced players to understand. In simple terms, a tempo refers to the “time” or “turn” it takes to make a move. Gaining tempo means that you can achieve a goal more efficiently, while losing tempo means that you are giving your opponent time to improve their position. Understanding how tempo works, and how to gain or lose tempo deliberately, can significantly enhance your chess skills.

In this article, we’ll break down the idea of tempo in chess and explore how it impacts different stages of the game, from the opening to the endgame. We’ll also dive into the difference between tempo and initiative, as well as offer actionable tips on how to use tempo to your advantage.

How Does Chess Tempo Work?

In chess, tempo is measured by the number of moves it takes to accomplish a goal. Gaining tempo means making moves that advance your position while forcing your opponent to waste time, often by responding to threats or repositioning pieces inefficiently. Losing tempo, on the other hand, usually happens when you move the same piece multiple times unnecessarily or fail to keep up with your opponent’s pace of development.

For example, if you attack your opponent’s queen with a minor piece, and they move it out of harm’s way without improving their position, you’ve gained a tempo. Conversely, if you move your queen early and it gets chased around by your opponent’s pieces, you’ve lost tempo.

The Importance of Tempo in Chess Strategy

Tempo is especially important in fast-paced games and tactical battles. In the opening, tempo helps you quickly develop your pieces and control the center. In the middlegame, gaining tempo can help you launch a more effective attack or defend against threats. In the endgame, tempo often decides the winner in situations where precise positioning and timing are crucial (such as pawn races).

Here are a few reasons why tempo is crucial:

  • Faster Development: Gaining tempo allows you to develop your pieces efficiently and seize control of key squares.
  • Initiative: When you gain tempo, you often maintain the initiative, or the ability to dictate the pace and direction of the game.
  • Positional Superiority: If you consistently gain tempo, you force your opponent into a defensive stance, weakening their overall position.

How to Gain Tempo in Chess

Gaining tempo involves making moves that not only improve your own position but also force your opponent to react in a way that is less efficient for them. Here are some ways to gain tempo:


  • Attacking Unprotected Pieces: By threatening your opponent’s pieces, especially valuable ones like the queen, you force them to react, allowing you to improve your position while they scramble to protect theirs.
  • Developing Pieces with Purpose: Always aim to move pieces to squares where they influence multiple parts of the board. Avoid moving the same piece multiple times unless absolutely necessary.
  • Avoiding Passive Moves: Moves that don’t challenge your opponent or don’t improve your position are a waste of tempo. Always aim to make every move count.

What is the Difference Between Tempo and Initiative in Chess?

While tempo refers to the time it takes to make a move, initiative refers to control over the game’s flow. When you have the initiative, you’re in the driver’s seat, forcing your opponent to react to your moves. Gaining tempo can lead to gaining the initiative, but the two are not the same.

For example, even if both players are making moves with equal tempo, one player might have the initiative because their moves are more aggressive or forceful. Conversely, you could have gained tempo but lost the initiative if your opponent launches a surprise attack that forces you to respond defensively.

Examples of Tempo in Famous Chess Games

Understanding tempo becomes clearer when looking at historical games where gaining or losing tempo was pivotal. For instance, in many grandmaster-level games, a player gains tempo by forcing their opponent to retreat or defend pieces unnecessarily, giving them a developmental or attacking advantage.

A famous example is from Bobby Fischer’s games, where he was known for gaining tempo during the opening and quickly transitioning into aggressive attacks that left his opponents on the back foot.

Losing Tempo: When Is It Acceptable?

While gaining tempo is ideal, sometimes losing tempo is strategically necessary. This often happens in positional play or endgames, where precise timing is more important than quick development. For example, in zugzwang positions, a player may be forced to lose a tempo (a waiting move) to make their opponent weaken their position.

How to Lose Tempo on Purpose (Waiting Moves)

In some positions, losing tempo can actually be a strategic move. In the endgame, you may deliberately make a waiting move to force your opponent into a weakened position, especially in zugzwang, where any move they make worsens their situation.

One common example is in king-pawn endgames, where the idea of opposition comes into play. By losing tempo, you can often force your opponent to move their king away from a critical square, allowing you to gain a decisive advantage.

Tempo in the Middlegame vs. Endgame

In the middlegame, tempo is often about piece activity and tactical threats. Gaining tempo through an attack, or threatening a piece that forces your opponent to react, can be the key to unlocking a strong initiative.

In the endgame, tempo is often about precise maneuvering. Pawn races, king activity, and opposition are all areas where gaining or losing tempo is crucial. One wrong move in the endgame can result in the loss of tempo, and consequently, the game.

Common Mistakes That Lose Tempo

Beginners often lose tempo by moving the same piece multiple times in the opening, neglecting development, or making passive moves that don’t challenge their opponent. Here are a few common mistakes:


  • Moving the queen too early and being forced to retreat it.
  • Shuffling pieces back and forth without a clear plan.
  • Failing to develop all pieces, leaving them inactive while the opponent gains space.

Tempo in Various Chess Openings

Many chess openings are designed to either gain tempo or minimize tempo loss. For example, gambits like the King’s Gambit or the Danish Gambit often sacrifice material for rapid development, aiming to gain tempo by forcing the opponent to respond to immediate threats.

How to Counter Your Opponent’s Tempo Moves

If your opponent is gaining tempo and you’re falling behind, consider moves that slow down their progress without losing material or position. Counter-attacking, exchanging pieces to simplify the position, or finding solid defensive moves can neutralize their tempo advantage.

Conclusion: Mastering Tempo in Chess

Tempo is a subtle but crucial element of chess strategy. Whether you’re playing a rapid, blitz, or classical game, understanding how to gain and lose tempo can give you a competitive edge. By focusing on efficient development, avoiding unnecessary moves, and maintaining the initiative, you’ll find yourself improving not only your tempo but your overall chess skills as well.

By mastering the art of tempo, you can control the pace of the game, dictate your opponent’s moves, and ultimately steer the game in your favor. Good luck, and may your future games be full of well-timed moves!

Key Takeaway: Always aim to make every move count. Every move that improves your position and forces your opponent to react inefficiently is a tempo gained, and in chess, gaining tempo means gaining control.

How to Evaluate a Chess Position like a GM

How to Evaluate a Chess Position like a GM

Navigating the chessboard requires more than memorizing openings or delivering checkmate patterns. A fundamental aspect of playing chess at a high level is the ability to evaluate positions effectively. This invaluable skill allows you to interpret the intricacies of a position, make informed decisions, and build efficient strategies. This guide is designed to introduce the crucial steps to evaluating a chess position like a Grandmaster.

Why is Evaluating Chess Positions Important?

Chess, at its core, is a strategic battle. You’re not just moving pieces on a board; you’re making calculated decisions that shape the course of the game. Each move you make is like a sentence in a story, and evaluating the position allows you to write the next line with insight and precision. Without evaluation, you’re merely reacting to your opponent’s moves instead of creating your own narrative.

The Art of Making Informed Decisions: Why Evaluate Positions?

Evaluating a chess position isn’t a chore or a luxury; it’s a necessity. It provides a comprehensive picture of the game, revealing the strengths, weaknesses, threats, and opportunities in the position. When you can accurately assess a position, your moves become more than just reactions – they’re calculated responses based on strategic understanding.

Formulating Effective Plans Through Evaluation

Understanding the current state of the board is the first step towards formulating an effective plan. Whether it’s launching an attack, consolidating your position, or exploiting a weakness in your opponent’s setup, a thorough evaluation helps you develop a game plan that’s grounded in the reality of the position.

Safety First: Evaluating the Position of Your King and Your Opponent’s King

In chess, your king is your most vital piece, and its safety is paramount. When evaluating a position, consider factors like the security of your king, potential threats, and the safety of your opponent’s king. A secure king can be a launchpad for aggressive strategies, while a vulnerable one can spell disaster.

The Material Balance: Understanding the Value of Each Piece

In chess, each piece has a specific value, and knowing the material balance can help you make crucial decisions. However, the true power of a piece isn’t in its inherent value, but its potential based on its position. Understanding how to evaluate material can provide you with strategic advantages and insights that can turn the tide of a game.

On The Move: Evaluating Piece Activity

Not all pieces are created equal. Some pieces might hold strategic positions, while others might be underutilized or poorly positioned. Evaluating the activity of your pieces, and those of your opponent, provides a more nuanced understanding of the board. It’s not enough to just count your pieces; you need to make sure they’re working for you.

The Long Game: Assessing Structure and Long-Term Factors

Chess isn’t just about the immediate struggle; it’s also about planning for the future. One essential aspect of this is evaluating the pawn structure, which shapes the battlefield and influences the long-term strengths and weaknesses of your position. An isolated pawn, a potential outpost, or a pawn majority on the queenside – these are all long-term factors that should shape your strategy.

More Than Just Squares: Evaluating Space Advantage

Chess is a game of space, and controlling more of it often gives you an edge. A space advantage allows greater mobility for your pieces, provides opportunities to launch attacks, and can limit your opponent’s options. Understanding how to leverage a spatial advantage is a crucial part of positional evaluation.

From Evaluation to Decision: Finding the Right Move

After you’ve evaluated the position, what next? It’s time to make your move. But not just any move—the best move. And the best move isn’t always the most obvious one. By considering different factors like king safety, material balance, piece activity, and space control, you can uncover moves that align with your strategic goals.

Keeping an Eye Out: Evaluating Tactical Opportunities

Chess isn’t all strategy and planning. Sometimes, it’s about sharp tactics and stunning combinations. As you evaluate a position, keep an eye out for tactical opportunities. These could be potential threats to your opponent, opportunities for you to launch a powerful combination, or just simple tactical motifs that can improve your position.

Mastering the Art of Evaluation: Practice Makes Perfect

Just like any other skill, improving your positional evaluation requires practice. Challenge yourself with complex positions, and try to apply the principles we’ve discussed here. With consistent practice and patience, you’ll start seeing the chessboard like a Grandmaster in no time.

In conclusion, learning to evaluate chess positions like a Grandmaster can profoundly impact your understanding of the game. By developing this crucial skill, you’ll be better equipped to make strategic decisions that enhance your chances of success. So embrace the art of positional evaluation—your journey to becoming a stronger chess player starts here.

Here’s to your chess success!

Positional Play The Concept of Prophylaxis

Positional Play The Concept of Prophylaxis

Understanding the concept of prophylaxis is key to mastering the intricacies of positional chess play. Derived from the Greek term meaning “to guard or prevent beforehand”, prophylaxis in the realm of chess refers to the art of anticipating, denying, and countering your opponent’s plans, even before they get a chance to execute them. As players grow in their chess knowledge and skill, they realize that chess is not just about launching attacks; it’s also about nullifying potential threats. In this guide, we have delved into the fundamental ideas and strategies involved in prophylaxis, practical examples, and exercises to enhance your prophylactic skills. Prophylaxis is a skill that will serve you in every stage of the game, from the opening to the endgame, helping you to maintain a solid structure, balance defense with attacking opportunities, and shape the course of the game.

To achieve success in chess, it’s essential to develop a keen understanding of positional play and strategy. A central concept to this strategic approach is Prophylaxis, a principle that often plays a crucial role in a player’s decision-making process.

Understanding Positional Play: What is Prophylaxis and why is it important?

The term ‘Prophylaxis’ comes from the Greek word for ‘advance guarding.’ In the context of chess, it refers to moves that prevent your opponent’s plans before they materialize. Prophylaxis does not necessarily mean directly attacking an opponent’s piece; instead, it involves subtle positional moves that anticipate and block an opponent’s strategy.

This preventive approach is essential as it allows you to maintain a strong position and makes it harder for your opponent to execute their plans. Prophylaxis is a strategic foresight that separates proficient chess players from novices.

Identifying Potential Threats: How can you anticipate and prevent your opponent’s plans?

Developing a sense for prophylactic play starts with understanding your opponent’s threats and plans. You should always be asking yourself, “What is my opponent’s next move? What are they trying to accomplish?”

To anticipate threats, it’s essential to have a deep understanding of the position. This involves recognizing key squares, considering possible tactical and strategic threats, and identifying weak points in your own position that your opponent might target. Once you have identified potential threats, you can take preventive measures to counteract them.

The Role of Prophylaxis in Chess Strategy: How does it contribute to a solid positional approach?

In positional play, having a good prophylactic approach ensures you maintain control over the game. Prophylaxis allows you to respond to your opponent’s threats and plans without compromising your own. In essence, it allows you to dictate the pace of the game and restrict your opponent’s activities while furthering your own strategy.

Key Principles of Prophylaxis: What are the fundamental ideas and strategies involved?

There are several key principles to keep in mind when practicing prophylaxis in your games. These include:

  • Understanding your opponent’s plan: Always try to anticipate your opponent’s strategy and consider how you can disrupt it.
  • Considering the whole board: Chess is a game played on 64 squares; make sure to consider all of them when formulating your strategy.
  • Maintaining a solid position: A good prophylactic approach involves ensuring your position is solid and difficult for your opponent to exploit.

Prophylactic Moves: How can you make proactive and preventive moves to strengthen your position?

Prophylactic moves are preventive measures that strengthen your position and hinder your opponent’s plans. Such moves can range from advancing a pawn to provide a safe haven for your king, to repositioning a piece to a more optimal square, to controlling a key file or diagonal to limit your opponent’s activity.

One common prophylactic strategy is to keep your king safe. For instance, if you notice your opponent setting up for a potential attack on your king, a prophylactic move might be to reposition your king to a safer location, or to fortify the pawn structure around your king.

Prophylaxis is not about immediate gratification but about long-term strategic advantages. It requires patience, strategic vision, and a deep understanding of the game’s dynamics.

Creating Safety and Flexibility: What are the benefits of prophylaxis in maintaining a solid structure?

Prophylaxis provides numerous benefits, key among them being safety and flexibility. Safety is achieved as prophylactic moves are inherently geared towards preventing your opponent’s plans, therefore lessening the chance of any immediate threats to your position. Flexibility comes from the fact that these moves often do not commit you to a particular plan but allow you to adjust to your opponent’s actions.

Countering Opponent’s Prophylactic Moves: How do you respond to your opponent’s defensive measures?

Reacting to your opponent’s prophylactic moves often requires keen observation and deep understanding of the position. You need to identify what they are trying to prevent and find ways to complicate their plans. This could be done by creating counter threats or by exploiting weaknesses elsewhere on the board.

Balancing Prophylaxis with Active Play: How can you find the right balance between defense and attacking opportunities?

Balancing prophylaxis with active play can be challenging. It requires not only understanding the positional requirements but also assessing the dynamics of the position. Knowing when to play prophylactically and when to seize the initiative can only come from studying games, practicing, and playing regularly.

Practical Examples: Analyzing games where prophylaxis played a critical role in positional decision-making.

To appreciate the power of prophylaxis, we can look at the games of Grandmaster Tigran Petrosian, often considered a master of prophylactic play. One of his famous games, against Boris Spassky in the 1966 World Championship, showcases his ability to prevent his opponent’s plans while simultaneously improving his position.

Improving Prophylactic Thinking: What exercises and techniques can enhance your prophylactic skills?

Improving prophylactic thinking requires exercises and practice. Solving strategic puzzles, reading chess books, and using training tools can help. Specifically, you can practice identifying threats, study how to neutralize them, and learn to anticipate your opponent’s plans. Analyzing your own games to identify missed prophylactic opportunities is also highly beneficial.

Mastering Prophylaxis in Different Phases: How does the concept apply to the opening, middlegame, and endgame?

The principle of prophylaxis holds true for every stage of the game, whether it’s the opening, middlegame, or endgame. In the opening, prophylaxis might involve moves that prevent your opponent from establishing a desired pawn structure. In the middlegame, it might mean blocking your opponent’s pieces from occupying strong squares. The endgame often sees prophylaxis preventing pawn promotions or restricting the opponent’s king.

Evaluating Candidate Moves: What criteria should you consider when selecting prophylactic moves?

When evaluating prophylactic moves, several factors come into play. Firstly, understand your opponent’s ideas. Secondly, consider the quality of the position after your prophylactic move: does it improve or weaken your position? Thirdly, check if the move allows you to maintain or increase pressure elsewhere. A good prophylactic move will not only hinder your opponent’s plans but also contribute positively to your overall position.

Prophylaxis in Complex Positions: How does it relate to tactical combinations and strategic maneuvering?

Complex positions often call for a mix of prophylactic and active moves. Prophylactic thinking can help you avoid falling into tactical traps set by your opponent. Similarly, understanding potential tactical ideas can assist you in formulating your prophylactic strategy. Essentially, the more complex the position, the more intertwined strategy and tactics become.

Common Mistakes and Pitfalls: What are the errors to avoid when applying prophylactic thinking?

A common pitfall is over-focusing on prophylaxis and forgetting to create threats of your own. Chess is a dynamic game, and although preventing your opponent’s plans is important, it’s equally crucial to have your own plans. Another mistake is failing to correctly identify your opponent’s threats and making unnecessary prophylactic moves that waste time and energy.

Integrating Prophylaxis into Your Chess Repertoire: How can you incorporate these concepts into your overall strategy?

Prophylaxis should be integrated into your general chess thinking and not viewed as an isolated concept. It should inform your decisions in tandem with other strategic and tactical considerations. One way to integrate it into your chess repertoire is to consciously ask yourself before each move, “What is my opponent’s plan, and how can I prevent it?” With practice, this question will become a natural part of your thought process.

Learning from Prophylactic Experts: Studying games of grandmasters known for their strong prophylactic skills.

Learning from experts is a great way to strengthen your prophylactic abilities. Players such as Tigran Petrosian and Anatoly Karpov are renowned for their prophylactic prowess. Analyzing their games can provide insights into how these masters anticipate and counter their opponents’ threats.

Anticipating Opponent’s Prophylactic Plans: How can you recognize and disrupt your opponent’s defensive ideas?

Recognizing your opponent’s prophylactic intentions can be challenging, but it is crucial for formulating your countermeasures. Familiarity with common defensive strategies and understanding of positional play are beneficial. By visualizing possible sequences of moves and analyzing the implications, you can often discern your opponent’s plans and disrupt them.

Developing Prophylactic Vision: What exercises and training methods can enhance your ability to spot potential threats?

Training methods for enhancing prophylactic vision are quite varied. Playing out complex positions against a stronger opponent or a chess engine can be very beneficial. Solving chess puzzles that focus on defensive strategy can also sharpen your prophylactic thinking. Additionally, analyzing grandmaster games, as mentioned earlier, can provide a practical understanding of how prophylactic strategies are applied in real games.

Long-Term Planning and Prophylaxis: How can you use prophylaxis to shape the course of the game?

Prophylaxis plays a critical role in long-term planning. By preventing your opponent’s plans, you can shape the course of the game to your advantage. For example, by blocking your opponent’s pawn break or denying them a key square, you can maintain a grip on the position and steer the game in a favorable direction.

Applying Prophylaxis in Different Pawn Structures: What are the specific considerations based on the pawn formation?

The pawn structure often dictates the strategic themes of the position, and this includes prophylaxis. In positions with fixed pawn structures, prophylactic moves often revolve around preventing pawn breaks that could undermine your structure. In fluid pawn structures, prophylaxis might involve preventing your opponent from establishing a strong pawn center. Understanding these nuances can greatly enhance your positional play.

Wrapping it up!

Prophylaxis is more than just a defensive strategy. It’s a mindset, a way of thinking that can help you gain control over the board and the game itself. It’s about understanding the position from your opponent’s perspective and taking preventative measures to halt their plans in their tracks. As we’ve explored, mastering prophylaxis requires practice, analysis, and, importantly, learning from the experts. The more you expose yourself to different pawn structures, complex positions, and grandmaster games, the more intuitively you’ll understand the art of prophylaxis. Like any skill, it takes time to incorporate these concepts into your chess repertoire, but the rewards are well worth the effort. Whether you’re just beginning your chess journey or looking to take your game to the next level, developing a strong foundation in prophylaxis will undoubtedly lead to improved decision-making and ultimately, greater success on the chessboard.

The Achilles’ Heel in Chess: Identifying and Exploiting Weak Squares

The Achilles’ Heel in Chess: Identifying and Exploiting Weak Squares

Understanding and exploiting weak squares in chess can greatly improve your strategic gameplay. For beginners, learning to identify, control, and maneuver around these weak points can pave the way to achieving superior positions and, ultimately, winning games.

What are Weak Squares in Chess and Why are They Significant?

Before diving into the strategies to exploit weak squares, let’s understand what they are.

What are weak squares and why are they important in chess strategy?

A weak square, also referred to as a hole, is a square that can no longer be controlled by a pawn. The significance lies in the opportunity these squares provide for other pieces to establish strong posts, virtually immune to pawn attacks.

Identifying Weak Squares in Your Opponent’s Position

Being able to spot weak squares is the first step towards exploiting them.

How can you identify weak squares in your opponent’s position?

Observe the pawn structure. Squares that can’t be defended by pawns, especially in the enemy’s camp, are potential weak squares.

What techniques can you use to recognize weak squares?

Look out for pawn moves that leave squares undefended. Also, pawn exchanges often result in weak squares. Developing an eye for these situations takes practice, but it can greatly enhance your strategic play.

Exploiting Weak Squares for Advantage

Once you’ve identified weak squares, the next step is learning how to exploit them effectively.

How can you effectively exploit weak squares to gain an advantage?

The most common way to exploit a weak square is to place your pieces on it, especially knights. They can be a powerful force when placed on a secure outpost.

What strategies can you employ to leverage your pieces and control weak squares?

One strategy is to use your pieces to control access to these squares, preventing your opponent from using them. Also, consider pawn breaks or piece exchanges that might leave your opponent with more weak squares.

Weak Squares and Pawn Structures

Pawn structure plays a crucial role in the creation and control of weak squares.

What is the importance of weak squares in pawn structure and piece placement?

Pawn structures dictate the weak squares on the board. Double pawns, isolated pawns, or backward pawns often result in weak squares that can be targeted. Moreover, piece placement around these squares can provide offensive and defensive opportunities.

Creating and Inducing Weak Squares

While it’s crucial to exploit existing weak squares, advanced players can create them in their opponent’s position.

How can you create weak squares in your opponent’s position?

You can induce weaknesses by provoking pawn moves. For example, a well-timed attack might force your opponent to move a pawn, leaving a square undefended.

What are some effective ways to induce weaknesses and exploit weak squares?

Pawn exchanges, offering piece trades, or creating threats that require pawn moves are common ways to induce weak squares. Once created, occupy these squares with your pieces or maintain control over them.

Defending Your Own Weak Squares

It’s just as important to defend your weak squares as it is to exploit your opponent’s.

How can you defend against weak squares in your own position?

Consider which squares could become weak in your position and develop a plan to defend them. This could involve moving a piece to cover the square, or restructuring your pawns if possible.

What tips can you follow to strengthen and protect vulnerable squares?

A good defense often involves piece coordination. Also, try to avoid moving pawns that protect potential weak squares unless necessary.

Stay tuned for Part 2 of this blog post where we’ll delve deeper into weak squares in different game phases, tactical exploitation, and more ways to hone your awareness and skill in dealing with weak squares.

Weak Squares in Different Game Phases

The concept of weak squares remains relevant from the opening to the endgame.

Which weak squares are commonly observed in different openings?

Certain openings like the Sicilian Defense or the French Defense often lead to characteristic weak squares. In the Sicilian Defense, d5 can often become a weak square for black. In the French Defense, d4 can become a weak square for white.

How can you exploit weak squares in the middlegame and endgame?

In the middlegame, exploit weak squares by occupying them with your pieces, particularly knights. In the endgame, kings become mighty warriors. A weak square in the opponent’s camp can serve as an entry point for your king.

Tactical Exploitation of Weak Squares

Understanding the tactical themes related to weak squares can enhance your ability to exploit them.

What tactical patterns involve the exploitation of weak squares?

Outposts, blockades, and skewers often involve exploiting weak squares. For instance, a knight outpost on a weak square can be a thorn in the opponent’s side.

How can you recognize and utilize tactical combinations to exploit weaknesses?

Look for tactical themes like forks or pins that might arise from your control over weak squares. Pattern recognition is key here. Studying games and solving puzzles can help you internalize these patterns.

Learning from Notable Games

Examining games where weak square exploitation played a significant role can offer valuable lessons.

Can you provide examples of notable games where weak squares played a crucial role?

There are countless examples. One famous game is the match between Anatoly Karpov and Garry Kasparov in their 1985 World Championship match. In the 16th game, Karpov beautifully exploited a weak d5 square, demonstrating the power of weak square control.

Piece Placement and Weak Squares

The placement of pieces plays a major role in both creating and exploiting weak squares.

What is the significance of piece activity and control over weak squares?

Active pieces can exert pressure on weak squares and force the opponent into passive defense. Moreover, controlling weak squares often means controlling crucial lines and diagonals, restricting the opponent’s piece activity.

Improving Your Awareness and Skills

Continuous practice and learning resources can help you become adept at exploiting weak squares.

How can you improve your awareness of weak squares and their exploitation?

Playing games and analyzing them afterward is one of the best ways to improve. Try to identify weak squares in your games and see how you or your opponent exploited them.

What training exercises and resources are available to develop your understanding of weak squares?

Chess puzzles often revolve around exploiting weak squares. Online platforms like Chess.com and Lichess offer puzzle features. Chess books such as “My System” by Aron Nimzowitsch provide deep insights into weak square concepts.

In conclusion, understanding and exploiting weak squares can provide a significant edge in your games. Remember, mastering chess is a journey. With every game you play, every puzzle you solve, and every position you analyze, you’re one step closer to becoming a better chess player. Keep practicing, stay curious, and enjoy the game!

Pin It on Pinterest